Showing posts with label 3g. Show all posts
Showing posts with label 3g. Show all posts
Saturday, October 22, 2016
iPhone 3G 3GS Ultrasn0w Unlock file
iPhone 3G 3GS Ultrasn0w Unlock file

baseband 06.15.00 Support 100%okay work
 | iphone 3g 3gs without wifi unlock file for 4.1-4.1.2-4.3.3.7z Size : 4747.395 Kb Type : 7z |
| | Unlock iPhone 3gS without WiFi on iOS 5.1.1.7z Size : 112.025 Kb Type : 7z |
| | iphone without wifi unlock file for 3gs 6.1.2.7z Size : 243.257 Kb Type : 7z |
 | iphone 3gs 6.1.3 without wifi unlock file.rar Size : 120.542 Kb Type : rar |
| | iTools.7z Size : 3008.346 Kb Type : 7z |
iphone 3gs 6.1.6 jailbreak unlock susesfull
3gs iPhone2,1_6.1.6_10B500_Res
1) Restore your device with iPhone2,1_6.1.6_10B500
2) Jailbreak
2.1) Open redsn0w_win_0.9.15b3
2.2) Go to extra
2.3) Go to select ipsw
2.4) Select iPhone2,1_6.0_10A403_Resto
2.5) Back
2.6) Jailbreak
2.7) Next, follow the instructions to enter dfu mode
2.8) Check install cydia & install ipad baseband
2.9) Wait until jailbreak done
3) There will be no cydia in your device
3.1) Open redsn0w_win_0.9.15b3
3.2) Go to extra
3.3) Go to select ipsw
3.4) Select iPhone2,1_6.0_10A403_Resto
3.5) Go To Just boot
3.6) Follow the instructions to enter dfu mode
4) after device on u can see cydia
5) Open Cydia.
6) Click the "Changes" tab in the footer.
7) Press the "Refresh" button in the top left corner.
8) After "Reloading Data", perform a search for "p0sixspwn" (the O is a zero).
9) Tap Install.
10) After installing p0sixspwn your device is untethered
11) Install ultrasnow 1.2.8
Available link for download

Thursday, October 20, 2016
Cherry Mobile Spin 3G firmware stock rom to unbrick your phone
Cherry Mobile Spin 3G firmware stock rom to unbrick your phone
This firmware is for Cherry Mobile Spin 3G+ yes with a "+". This firmware is not compatible with Spin 3G. So do not use it in Spin 3G.
I have already tried and tested this firmware.

Some pictures below are just an example of my previous post. Replace scatter file with the correct firmware that you downloaded.
1. Bootloop
2. Damaged System UI
3. TP Upgrade only
4. Dead phone/Tablet but it is detected in computer
5. Remove Gmail Account / Password / Pattern Lock (Alternative Way)
6. Privacy Protection Password Lock up
7. Damage Apps (Force Closing)
8. Mount data error when hard resetting
9. Monkey Virus / Trojan Removal
"DOWNLOAD THESE FILES"
Firmware Here -->Cherry Mobile Spin 3G+
VCOM Driver -->VCOM Manual
Alternative Driver --> AutoInstaller
SPFlashTool --> LatestVersion
"When Downloading in DevHost make sure that your file is not in .exe format it should be a rar file. And dont press DOWNLOAD, press DOWNLOAD NOW"
"Use WinRar or 7zip to extract the firmware"
"Extract the files to your desired folder"
"If you encounter error in flashtool, use different version of it."
"Please report dead links"
"I suggest to use 32bit Windows OS for compatibility of the driver"
"You can also use 64bit version, just disable driver signing or driver signature before installing the driver."
"This is also working in Windows 10, just use the AutoDriverInstaller for the driver (32bit only, I have not tested on 64bit)"
Installing Driver with AutoInstaller
First try the Alternative Driver, which is the AutoInstaller. Just open the install.exe then it will automatically install the driver. To fully check if the driver is correctly installed in your computer.
Follow these steps:
- Turn off your phone (always powered off is a must)
- Press and hold volume up or down, or you can simple press the two button.
- Insert your USB cable without releasing the VOLUME button(s).
- In your computer, it must detect your phone and it will install the MTK Preloader or Mediatek USB VCOM driver.
- Repeat 1 to 4 if it does not detect your phone.
- If MTK Preloader/Mediatek USB VCOM Driver is installed you are good to go in flashing your phone ^_^
Reference Video using Driver Auto Installer (watch in HD)
Installing Manually using VCOM Driver
When installing it manually your phone must be turned off, then connect it to your computer/laptop while pressing VOLUME UP or VOLUME DOWN. This will detect and look for the driver.

1. This will be the first time that you will connect your phone and it will search for the correct driver.

2. Check include this location ... ... and click on browse. Look for USB VCOM Driver and Click on 2K_XP_COM folder if you are using Windows XP or Win7 for Windows 7 and then press OK when you are done picking the right folder for the driver.

3. If the driver is successfully installed MediaTek DA USB VCOM will appear in the New Hardware Wizard.
Video Installing VCOM Driver (please watch in HD)
"Your Phone must be turned off when you are ready to connect and flash your phone"
Flashing1. Launch FlashTool (flash_tool.exe)
2. In Flashtool, Click on Scatter-Loading, and load your scatter file. (see example below)
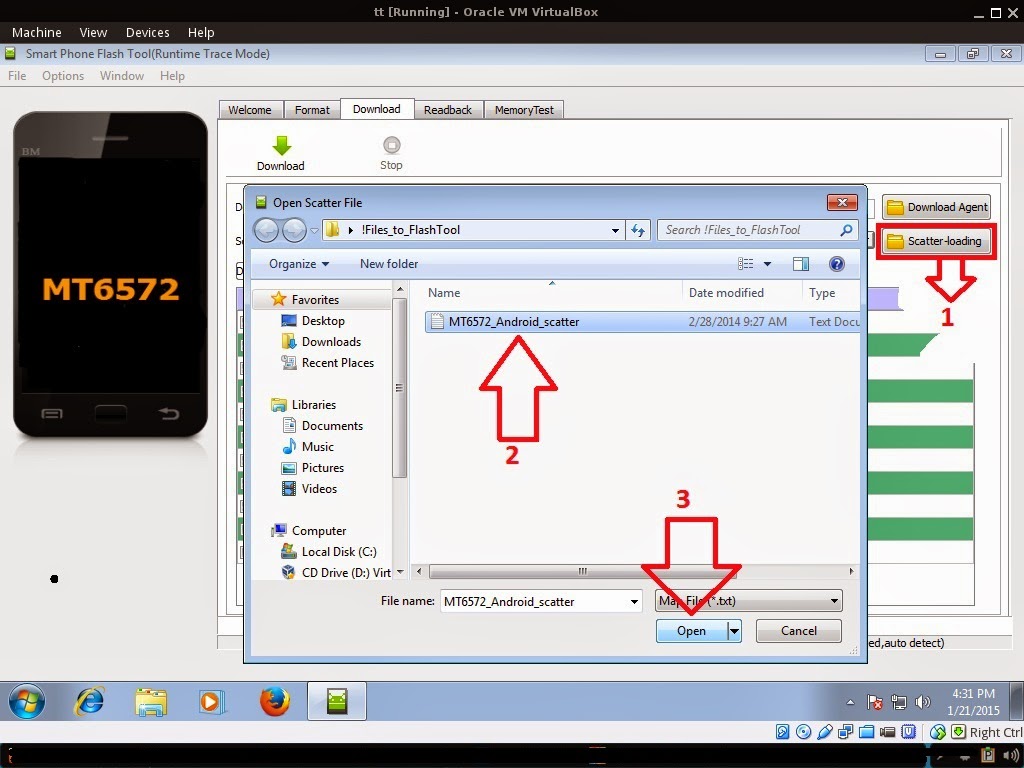 |
| Example only, May differ depending on phone. |
Reference Video Using FlashTool version 5.xxx (watch in HD)
3. After you load the file, UNCHECK PRELOADER and DSP only (Never flash preloader and DSP if available in firmware) If you cant proceed flashing without these two files then proceed at your own risk, press Press Download to Flash your Phone.
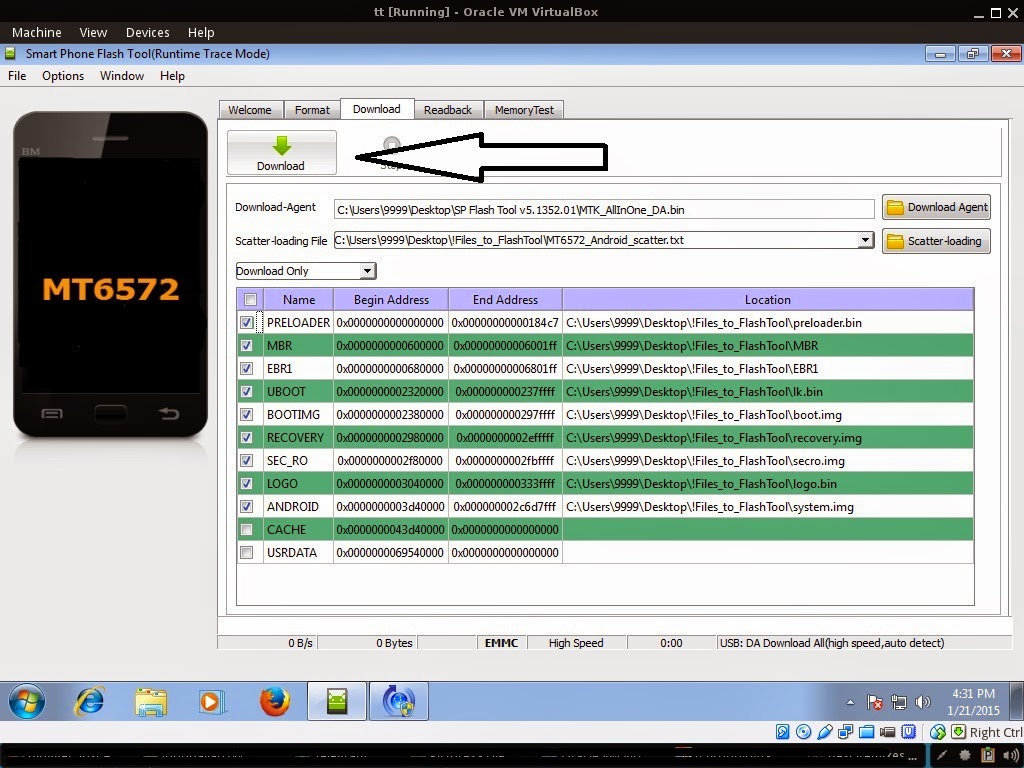
4. After you press Download Follow these steps
*** For non-removable battery just press the power button until the phone power up. Some phones have a reset button. You can press it to soft reset your phone.
Some workarounds:
- Turn off your phone or just remove the battery (always powered off is a must)
- Press and HOLD volume UP and Down.
- Insert your USB cable without releasing the VOLUME button(s).
- Keep on repeating until Flashtool detected your phone.
*** For non-removable battery just press the power button until the phone power up. Some phones have a reset button. You can press it to soft reset your phone.
"Hard reset your phone after flashing"
Some workarounds:
If you encounter PMT_Changed error here is what you do:
In Latest version of Flashtool
- PMT_CHANGED error occur when firmware is not compatible with your phone. Sometimes your phone has a different board version. You should check it too, if your firmware is compatible with your phone.
- Try Firmware upgrade
- Try different version of flashtool
- Try to set Format All + Download
- Or try Manual Format first then Download. (Go to format tab and make sure to check format except bootloader then press the play icon/start)
If you encounter Privacy Protection Password:
- Open flash_tool.exe
- Load the scatter file
- Goto Format Tab
- Click on Format except bootloader
- Press Play/Start Icon
- Then remove battery
- Insert the battery again
- Insert the USB cable (you should hear a beep on your computer, and it should proceed in formatting.)
- After done formatting proceed in Flashing.
- Goto Download tab (I assume that you loaded the scatter file already)
- Uncheck PRELOADER (this is very important)
- Press Download
- Then remove battery
- Insert Battery again
- Insert the USB cable (you should hear a beep on your computer, and it should proceed in flashing or downloading the firmware in your phone.)
- Power ON the phone after flashing.
- Restore your IMEI.
For Invalid IMEI (Does not work in MT6571 SoC):
- Root your phone via vRoot/iRoot/Kingoroot or your preferred method in rooting you device. Your phone must be rooted first.
- Download MTKDroidsTool version 2.4.8 and version 2.5.3
- Enable your USB debugging in Developer Option (you also need this in rooting your phone via PC)
- Okay in your PC -- Open MTKDroidstool version 2.4.8 (Mtkdroidstool.exe) first. Make sure that you connected your phone already.
- Still in Mtkdroidstool -- Click ROOT
- In your phone -- A pop up dialogue will appear, just grant or allow it.
- In your PC -- If root shell is granted/allowed, Click in IMEI/NVRAM tab. If it is grayed out this is the time when you open the MTKDroidsTool version 2.5.3.
- Enter your original IMEI
- Click Replace
- Reboot your phone
1. Make sure you have MTKDROIDSTOOL version 2.4.8 or version 2.5.3 (you can search it in google)
I hope this tutorial help you. Please drop a comment if something is not clear to you.
Available link for download
Wednesday, October 19, 2016
Intex Aqua 3G Plus Flash File Stock Rom Firmware Download
Intex Aqua 3G Plus Flash File Stock Rom Firmware Download
Intex Aqua 3G Plus Flash File (Stock Rom) New Version 100% Tested
Intex Aqua 3G Plus Flash File,Intex Aqua 3G Plus Stock Rom,Intex Aqua 3G Plus Firmware,Intex Aqua 3G Plus Flash File Download,Intex Aqua 3G Plus Stock Rom Download,Intex Aqua 3G Plus Firmware Download,

Intex Aqua 3G Plus Usb Driver
Intex Aqua 3G Plus Flash Tool
Intex Aqua 3G Plus Stock Rom
Model: Intex Aqua 3G+
Country: All
Android Version: 4.4.2
How to Flash: See Instructions
Download Size: 247 MB

Download
Available link for download
Tuesday, October 18, 2016

Wednesday, October 12, 2016
Samsung 2g 3g Tool Latest Version V22 5 Full Setup Free Download
Samsung 2g 3g Tool Latest Version V22 5 Full Setup Free Download
Samsung 2G+3G tool latest update version V22.5 full setup installer free download for windows. You can download and install Samsung 2g+3g tool new version directly from this page. Downloading links for Samsung tool is given at the bottom of this article. Download links for Samsung tool is completely free. So download and enjoy Samsung 2g+3g tool latest version now.

Supported Windows OS:
Windows Xp (32 Bit/64 Bit), Windows Vista (32 Bit/64 Bit), Windows 7 (32 Bit/64 Bit), Windows 8 (32 Bit/64 Bit).
If you want to download z3x box Samsung 2g+3g tool, then just one click on the link from your mouse your downloading will start automatically.
Download Samsung Tool (mediafire)
Available link for download
Samsung 2g 3g tool New Version V22 5 Free Download Full Setup
Samsung 2g 3g tool New Version V22 5 Free Download Full Setup
Samsung 2g+3g tool:
Samsung 2g+3g tool new version v22.5 full setup has been released and ready to free download for windows. You can download samsung 2g+3g tool new version by click the downloading link which is available at the end of this post. Samsung 2g+3g tool new version brings a lot of new and amazing features. After completed downloading you can enjoy these latest features. The downloading of this latest tool is so simple and very easy to use.

Supported Windows Os:
Windows 7 (32 bit and 64 bit), Windows 8 (32 bit and 64 bit), Windows vista (32 bit and 64 bit).
So click the given downloading link to start download samsung 2g+3g tool latest version now and completely free.
Download here:
Available link for download
Friday, October 7, 2016
Intex Aqua 3G Mini Flash File Stock Rom Firmware Download
Intex Aqua 3G Mini Flash File Stock Rom Firmware Download
Intex Aqua 3G Mini Flash File (Stock Rom) New Version 100% Tested
Intex Aqua 3G Mini Flash File,Intex Aqua 3G Mini Stock Rom,Intex Aqua 3G Mini Firmware,Intex Aqua 3G Mini Flash File Download,Intex Aqua 3G Mini Stock Rom Download,Intex Aqua 3G Mini Firmware Download,

Intex Aqua 3G Mini Usb Driver
Intex Aqua 3G Mini Flash Tool
Intex Aqua 3G Mini Stock Rom
Model: Intex Aqua 3G Mini
Country: All
Android Version: 4.4.2
How to Flash: See Instructions
Download Size: 493 MB

Download
Available link for download
Friday, September 30, 2016
Intex Aqua 3G Flash File Stock Rom Firmware Download
Intex Aqua 3G Flash File Stock Rom Firmware Download
Intex Aqua 3G Flash File (Stock Rom) New Version 100% Tested
Intex Aqua 3G Flash File,Intex Aqua 3G Stock Rom,Intex Aqua 3G Firmware,Intex Aqua 3G Flash File Download,Intex Aqua 3G Stock Rom Download,Intex Aqua 3G Firmware Download,

Intex Aqua 3G Usb Driver
Intex Aqua 3G Flash Tool
Intex Aqua 3G Stock Rom
Model: Intex Aqua 3G
Country: All
Android Version: 4.4.2
How to Flash: See Instructions
Download Size: 266 MB
Download
Available link for download
Thursday, September 29, 2016
Torque Droidz Play 3G firmware stock rom to unbrick your phone
Torque Droidz Play 3G firmware stock rom to unbrick your phone
Hi,
I have a new firmware and this is for Torque Droidz Play 3G, this is a firmware ROM DUMP only.
The firmware is already Clock Work Mod recovery ready. you can also flash the stock recovery which is located inside the firmware folder.

Some pictures below are just an example of my previous post. Replace scatter file with the correct firmware that you downloaded.
The firmware is already Clock Work Mod recovery ready. you can also flash the stock recovery which is located inside the firmware folder.
Some pictures below are just an example of my previous post. Replace scatter file with the correct firmware that you downloaded.
1. Bootloop
2. Damaged System UI
3. TP Upgrade only
4. Dead phone but it is detected in computer
5. Remove Gmail Account / Password / Pattern Lock (Alternative Way)
6. Privacy Protection Password Lock up
"DOWNLOAD THESE FILES"
Firmware Here -->Torque Droidz Play 3G Part 1
Firmware Here -->Torque Droidz Play 3G Part 2
VCOM Driver -->VCOM Manual
Alternative Driver --> AutoInstaller
SPFlashTool --> LatestVersion
"Use WinRar or 7zip to extract the firmware"
"Extract the files to your desired folder"
"If you encounter error in flashtool, use different version of it."
"Extract the files to your desired folder"
"If you encounter error in flashtool, use different version of it."
"I suggest to use 32bit Windows OS for compatibility of the driver"
"You can also use 64bit version, just disable driver signing or driver signature before installing the driver."
Installing Driver with AutoInstaller
First try the Alternative Driver, which is the AutoInstaller. Just open the install.exe then it will automatically install the driver. To fully check if the driver is correctly installed in your computer.
Follow these steps:
- Turn off your phone (always powered off is a must)
- Press and hold volume up or down, or you can simple press the two button.
- Insert your USB cable without releasing the VOLUME button(s).
- In your computer, it must detect your phone and it will install the MTK Preloader or Mediatek USB VCOM driver.
- Repeat 1 to 4 if it does not detect your phone.
- If MTK Preloader/Mediatek USB VCOM Driver is installed you are good to go in flashing your phone ^_^
Reference Video using Driver Auto Installer (watch in HD)
Installing Manually using VCOM Driver
When installing it manually your phone must be turned off, then connect it to your computer/laptop while pressing VOLUME UP or VOLUME DOWN. This will detect and look for the driver.
1. This is the first time that you will connect your phone and it will search for the correct driver.
2. Check include this location ... ... and click on browse. Look for USB VCOM Driver and Click on 2K_XP_COM folder if you are using Windows XP or Win7 for Windows 7 and then press OK when you are done picking the right folder for the driver.
3. If the driver is successfully installed MediaTek DA USB VCOM will appear in the New Hardware Wizard.
Video Installing VCOM Driver (please watch in HD)
"Your Phone must be turned off when you are ready to connect and flash your phone"
Flashing1. Launch FlashTool (flash_tool.exe)
2. In Flashtool, Click on Scatter-Loading, and load your scatter file. (see example below)
|
| Example only, May differ depending on phone. |
Reference Video Using FlashTool version 5.xxx (watch in HD)
3. After you load the file, UNCHECK PRELOADER and DSP only (Never flash preloader and DSP if available in firmware) If you cant proceed flashing without these two files then proceed at your own risk, press Press Download to Flash your Phone.
4. After you press Download Follow these steps
*** For non-removable battery just press the power button until the phone power up. Some phones have a reset button. You can press it to reset your phone.
Some workarounds:
- Turn off your phone (always powered off is a must)
- Press and HOLD volume UP or Down or you can simply press it simultaneously
- Insert your USB cable without releasing the VOLUME button(s).
- Keep on repeating until Flashtool detected your phone.
*** For non-removable battery just press the power button until the phone power up. Some phones have a reset button. You can press it to reset your phone.
"Hard reset your phone after flashing"
Some workarounds:
If you encounter PMT_Changed error here is what you do:
In Latest version of Flashtool
- PMT_CHANGED error occur when firmware is not compatible with your phone. Sometimes your phone has a different board version. You should check it too, if your firmware is compatible with your phone.
- Try Firmware upgrade
- Try different version of flashtool
- Try to set Format All + Download
- Or try Manual Format first then Download.
If you encounter Privacy Protection Password:
- Open flash_tool.exe
- Load the scatter file
- Goto Format Tab
- Click on Format except bootloader
- Press Play/Start Icon
- Then remove battery
- Insert the battery again
- Insert the USB cable (you should hear a beep on your computer, and it should proceed in formatting.)
- After done formatting proceed in Flashing.
- Goto Download tab (I assume that you loaded the scatter file already)
- Uncheck PRELOADER (this is very important)
- Press Download
- Then remove battery
- Insert Battery again
- Insert the USB cable (you should hear a beep on your computer, and it should proceed in flashing or downloading the firmware in your phone.)
- Power ON the phone after flashing.
- Restore your IMEI.
For Invalid IMEI (Does not work in MT6571 SoC):
- Root your phone via vRoot/iRoot/Kingoroot or your preferred method in rooting you device. Your phone must be rooted first.
- Download MTKDroidsTool version 2.4.8 and version 2.5.3
- Enable your USB debugging in Developer Option (you also need this in rooting your phone via PC)
- Okay in your PC -- Open MTKDroidstool version 2.4.8 (Mtkdroidstool.exe) first. Make sure that you connected your phone already.
- Still in Mtkdroidstool -- Click ROOT
- In your phone -- A pop up dialogue will appear, just grant or allow it.
- In your PC -- If root shell is granted/allowed, Click in IMEI/NVRAM tab. If it is grayed out this is the time when you open the MTKDroidsTool version 2.5.3.
- Enter your original IMEI
- Click Replace
- Reboot your phone
1. Make sure you have MTKDROIDSTOOL version 2.4.8 or version 2.5.3 (you can search it in google)
I hope this tutorial help you. Please drop a comment if something is not clear to you.
Tested by:
ME
Available link for download
Saturday, September 17, 2016
Intex Aqua 3G Pro Flash File Stock Rom Firmware Download
Intex Aqua 3G Pro Flash File Stock Rom Firmware Download
Intex Aqua 3G Pro Flash File (Stock Rom) New Version 100% Tested
Intex Aqua 3G Pro Flash File,Intex Aqua 3G Pro Stock Rom,Intex Aqua 3G Pro Firmware,Intex Aqua 3G Pro Flash File Download,Intex Aqua 3G Pro Stock Rom Download,Intex Aqua 3G Pro Firmware Download,

Intex Aqua 3G Pro Usb Driver
Intex Aqua 3G Pro Flash Tool
Intex Aqua 3G Pro Stock Rom
Model: Intex Aqua 3G Pro
Country: All
Android Version: 4.4.2
How to Flash: See Instructions
Download Size: 320 MB


Available link for download
Wednesday, September 14, 2016
Superion Radar 3G firmware stock rom to unbrick your tablet
Superion Radar 3G firmware stock rom to unbrick your tablet
Hi,
I have a new firmware and this is for Cherry Mobile Superion Radar 3G, this file is a rom dump only and I havent tested it yet. Its a bit risky to flash this firmware because I have not tested it yet. Try it if you have a dead or brick tablet.

Some pictures below are just an example of my previous post. Replace scatter file with the correct firmware that you downloaded.
Some pictures below are just an example of my previous post. Replace scatter file with the correct firmware that you downloaded.
1. Bootloop
2. Damaged System UI
3. TP Upgrade only
4. Dead phone but it is detected in computer
5. Remove Gmail Account / Password / Pattern Lock (Alternative Way)
6. Privacy Protection Password Lock up
"DOWNLOAD THESE FILES"
Firmware Here -->Cherry Mobile Superion Radar 3G Part 1
Firmware Here -->Cherry Mobile Superion Radar 3G Part 2
Firmware Here -->Cherry Mobile Superion Radar 3G Part 3
VCOM Driver -->VCOM Manual
Alternative Driver --> AutoInstaller
SPFlashTool --> LatestVersion
"Use WinRar or 7zip to extract the firmware"
"Extract the files to your desired folder"
"If you encounter error in flashtool, use different version of it."
"Please report dead links"
"Extract the files to your desired folder"
"If you encounter error in flashtool, use different version of it."
"Please report dead links"
"I suggest to use 32bit Windows OS for compatibility of the driver"
"You can also use 64bit version, just disable driver signing or driver signature before installing the driver."
"This is also working in Windows 10, just use the AutoDriverInstaller for the driver"
Installing Driver with AutoInstaller
First try the Alternative Driver, which is the AutoInstaller. Just open the install.exe then it will automatically install the driver. To fully check if the driver is correctly installed in your computer.
Follow these steps:
- Turn off your phone (always powered off is a must)
- Press and hold volume up or down, or you can simple press the two button.
- Insert your USB cable without releasing the VOLUME button(s).
- In your computer, it must detect your phone and it will install the MTK Preloader or Mediatek USB VCOM driver.
- Repeat 1 to 4 if it does not detect your phone.
- If MTK Preloader/Mediatek USB VCOM Driver is installed you are good to go in flashing your phone ^_^
Reference Video using Driver Auto Installer (watch in HD)
Installing Manually using VCOM Driver
When installing it manually your phone must be turned off, then connect it to your computer/laptop while pressing VOLUME UP or VOLUME DOWN. This will detect and look for the driver.
1. This is the first time that you will connect your phone and it will search for the correct driver.
2. Check include this location ... ... and click on browse. Look for USB VCOM Driver and Click on 2K_XP_COM folder if you are using Windows XP or Win7 for Windows 7 and then press OK when you are done picking the right folder for the driver.
3. If the driver is successfully installed MediaTek DA USB VCOM will appear in the New Hardware Wizard.
Video Installing VCOM Driver (please watch in HD)
"Your Phone must be turned off when you are ready to connect and flash your phone"
Flashing1. Launch FlashTool (flash_tool.exe)
2. In Flashtool, Click on Scatter-Loading, and load your scatter file. (see example below)
|
| Example only, May differ depending on phone. |
Reference Video Using FlashTool version 5.xxx (watch in HD)
3. After you load the file, UNCHECK PRELOADER and DSP only (Never flash preloader and DSP if available in firmware) If you cant proceed flashing without these two files then proceed at your own risk, press Press Download to Flash your Phone.
4. After you press Download Follow these steps
*** For non-removable battery just press the power button until the phone power up. Some phones have a reset button. You can press it to reset your phone.
Some workarounds:
- Turn off your phone (always powered off is a must)
- Press and HOLD volume UP or Down or you can simply press it simultaneously
- Insert your USB cable without releasing the VOLUME button(s).
- Keep on repeating until Flashtool detected your phone.
*** For non-removable battery just press the power button until the phone power up. Some phones have a reset button. You can press it to reset your phone.
"Hard reset your phone after flashing"
Some workarounds:
If you encounter PMT_Changed error here is what you do:
In Latest version of Flashtool
- PMT_CHANGED error occur when firmware is not compatible with your phone. Sometimes your phone has a different board version. You should check it too, if your firmware is compatible with your phone.
- Try Firmware upgrade
- Try different version of flashtool
- Try to set Format All + Download
- Or try Manual Format first then Download.
If you encounter Privacy Protection Password:
- Open flash_tool.exe
- Load the scatter file
- Goto Format Tab
- Click on Format except bootloader
- Press Play/Start Icon
- Then remove battery
- Insert the battery again
- Insert the USB cable (you should hear a beep on your computer, and it should proceed in formatting.)
- After done formatting proceed in Flashing.
- Goto Download tab (I assume that you loaded the scatter file already)
- Uncheck PRELOADER (this is very important)
- Press Download
- Then remove battery
- Insert Battery again
- Insert the USB cable (you should hear a beep on your computer, and it should proceed in flashing or downloading the firmware in your phone.)
- Power ON the phone after flashing.
- Restore your IMEI.
For Invalid IMEI (Does not work in MT6571 SoC):
- Root your phone via vRoot/iRoot/Kingoroot or your preferred method in rooting you device. Your phone must be rooted first.
- Download MTKDroidsTool version 2.4.8 and version 2.5.3
- Enable your USB debugging in Developer Option (you also need this in rooting your phone via PC)
- Okay in your PC -- Open MTKDroidstool version 2.4.8 (Mtkdroidstool.exe) first. Make sure that you connected your phone already.
- Still in Mtkdroidstool -- Click ROOT
- In your phone -- A pop up dialogue will appear, just grant or allow it.
- In your PC -- If root shell is granted/allowed, Click in IMEI/NVRAM tab. If it is grayed out this is the time when you open the MTKDroidsTool version 2.5.3.
- Enter your original IMEI
- Click Replace
- Reboot your phone
1. Make sure you have MTKDROIDSTOOL version 2.4.8 or version 2.5.3 (you can search it in google)
I hope this tutorial help you. Please drop a comment if something is not clear to you.
Available link for download
Subscribe to:
Posts (Atom)