Showing posts with label custom. Show all posts
Showing posts with label custom. Show all posts
Thursday, October 13, 2016
Cloudfone Excite 500q firmware custom ROM to unbrick your phone
Cloudfone Excite 500q firmware custom ROM to unbrick your phone
Hi,
First of all I would like to say thank you to the FB Group of Cloudfone Excite 500q, I found the custom rom their (But there is no files for SPFT only custom rom). And to the owner of this ROM thank you.
This is not a Stock ROM but a Samsung Custom ROM. I cannot find link for Stock for this phone so I made a custom rom flashable via SPFlashtool.
The firmware is not compatible with Cloudfone Geo 500q because it has Spreadtrum Chip.

I have already tried and tested this firmware. And it is working flawlessly :)
Some pictures below are just an example of my previous post. Replace scatter file with the correct firmware that you downloaded.
1. Bootloop
2. Damaged System UI
3. TP Upgrade only
4. Dead phone but it is detected in computer
5. Remove Gmail Account / Password / Pattern Lock (Alternative Way)
6. Privacy Protection Password Lock up
7. Damage Apps (Force Closing)
8. Mount data error when hard resetting
9. Monkey Virus / Trojan Removal
"DOWNLOAD THESE FILES"
Firmware Here -->Cloudfone Excite 500q Part 1
Firmware Here -->Cloudfone Excite 500q Part 2
Firmware Here -->Cloudfone Excite 500q Part 3
Firmware Here -->Cloudfone Excite 500q Part 4
Alternative Driver --> AutoInstaller
SPFlashTool --> LatestVersion
"When Downloading in DevHost make sure that your file is not in .exe format it should be a rar file. And dont press DOWNLOAD, press DOWNLOAD NOW"
"Use WinRar or 7zip to extract the firmware"
"Extract the files to your desired folder"
"If you encounter error in flashtool, use different version of it."
"Please report dead links"
"I suggest to use 32bit Windows OS for compatibility of the driver"
"You can also use 64bit version, just disable driver signing or driver signature before installing the driver."
"This is also working in Windows 10, just use the AutoDriverInstaller for the driver"
Installing Driver with AutoInstaller
First try the Alternative Driver, which is the AutoInstaller. Just open the install.exe then it will automatically install the driver. To fully check if the driver is correctly installed in your computer.
Follow these steps:
- Turn off your phone (always powered off is a must)
- Press and hold volume up or down, or you can simple press the two button.
- Insert your USB cable without releasing the VOLUME button(s).
- In your computer, it must detect your phone and it will install the MTK Preloader or Mediatek USB VCOM driver.
- Repeat 1 to 4 if it does not detect your phone.
- If MTK Preloader/Mediatek USB VCOM Driver is installed you are good to go in flashing your phone ^_^
Reference Video using Driver Auto Installer (watch in HD)
Installing Manually using VCOM Driver
When installing it manually your phone must be turned off, then connect it to your computer/laptop while pressing VOLUME UP or VOLUME DOWN. This will detect and look for the driver.

1. This will be the first time that you will connect your phone and it will search for the correct driver.

2. Check include this location ... ... and click on browse. Look for USB VCOM Driver and Click on 2K_XP_COM folder if you are using Windows XP or Win7 for Windows 7 and then press OK when you are done picking the right folder for the driver.

3. If the driver is successfully installed MediaTek DA USB VCOM will appear in the New Hardware Wizard.
Video Installing VCOM Driver (please watch in HD)
"Your Phone must be turned off when you are ready to connect and flash your phone"
Flashing1. Launch FlashTool (flash_tool.exe)
2. In Flashtool, Click on Scatter-Loading, and load your scatter file. (see example below)
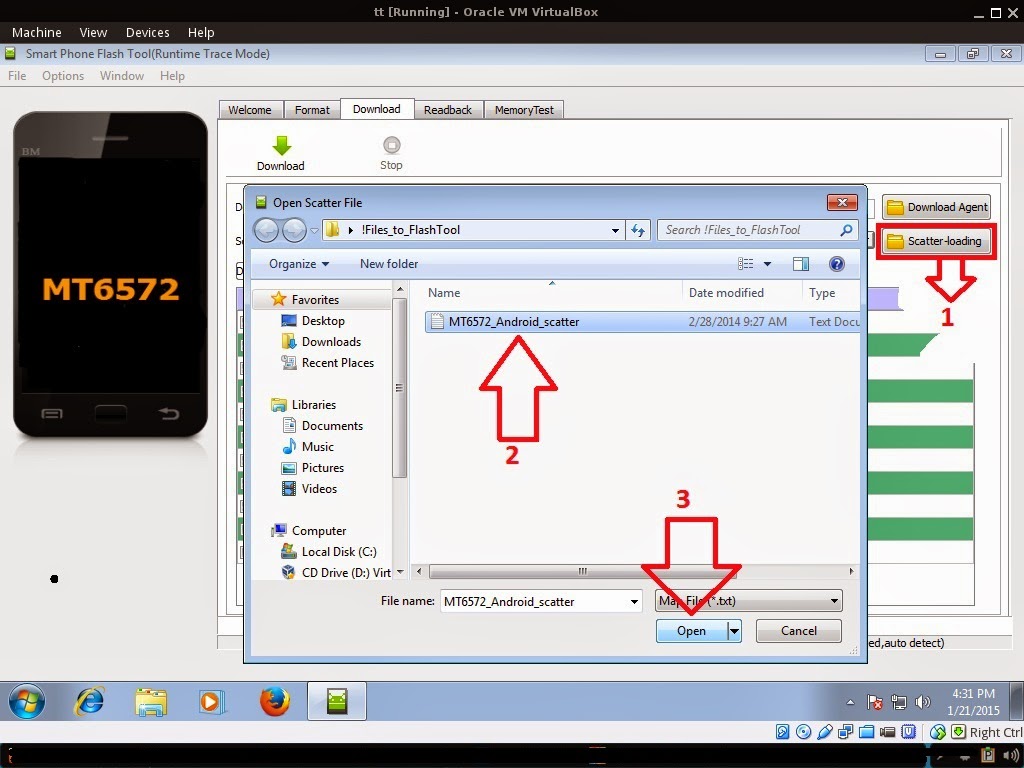 |
| Example only, May differ depending on phone. |
Reference Video Using FlashTool version 5.xxx (watch in HD)
3. After you load the file, UNCHECK PRELOADER and DSP only (Never flash preloader and DSP if available in firmware) If you cant proceed flashing without these two files then proceed at your own risk, press Press Download to Flash your Phone.
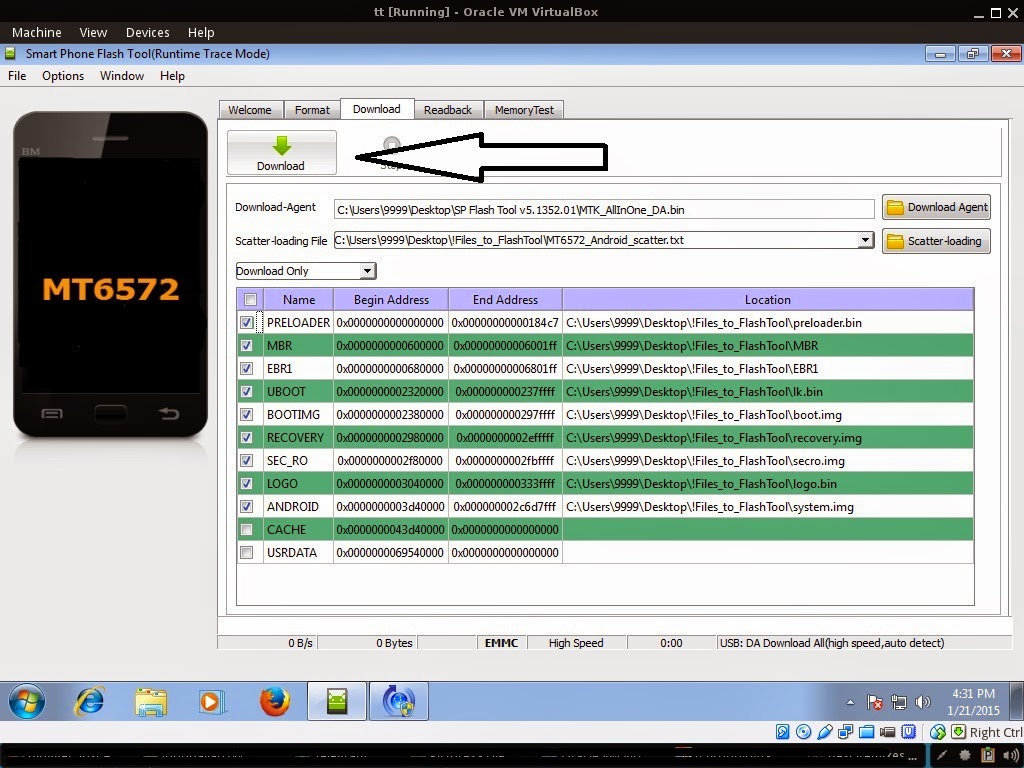
4. After you press Download Follow these steps
*** For non-removable battery just press the power button until the phone power up. Some phones have a reset button. You can press it to soft reset your phone.
Some workarounds:
- Turn off your phone or just remove the battery (always powered off is a must)
- Press and HOLD volume UP or Down or you can simply press it simultaneously
- Insert your USB cable without releasing the VOLUME button(s).
- Keep on repeating until Flashtool detected your phone.
*** For non-removable battery just press the power button until the phone power up. Some phones have a reset button. You can press it to soft reset your phone.
"Hard reset your phone after flashing"
Some workarounds:
If you encounter PMT_Changed error here is what you do:
In Latest version of Flashtool
- PMT_CHANGED error occur when firmware is not compatible with your phone. Sometimes your phone has a different board version. You should check it too, if your firmware is compatible with your phone.
- Try Firmware upgrade
- Try different version of flashtool
- Try to set Format All + Download
- Or try Manual Format first then Download. (Go to format tab and make sure to check format except bootloader then press the play icon/start)
If you encounter Privacy Protection Password:
- Open flash_tool.exe
- Load the scatter file
- Goto Format Tab
- Click on Format except bootloader
- Press Play/Start Icon
- Then remove battery
- Insert the battery again
- Insert the USB cable (you should hear a beep on your computer, and it should proceed in formatting.)
- After done formatting proceed in Flashing.
- Goto Download tab (I assume that you loaded the scatter file already)
- Uncheck PRELOADER (this is very important)
- Press Download
- Then remove battery
- Insert Battery again
- Insert the USB cable (you should hear a beep on your computer, and it should proceed in flashing or downloading the firmware in your phone.)
- Power ON the phone after flashing.
- Restore your IMEI.
For Invalid IMEI (Does not work in MT6571 SoC):
- Root your phone via vRoot/iRoot/Kingoroot or your preferred method in rooting you device. Your phone must be rooted first.
- Download MTKDroidsTool version 2.4.8 and version 2.5.3
- Enable your USB debugging in Developer Option (you also need this in rooting your phone via PC)
- Okay in your PC -- Open MTKDroidstool version 2.4.8 (Mtkdroidstool.exe) first. Make sure that you connected your phone already.
- Still in Mtkdroidstool -- Click ROOT
- In your phone -- A pop up dialogue will appear, just grant or allow it.
- In your PC -- If root shell is granted/allowed, Click in IMEI/NVRAM tab. If it is grayed out this is the time when you open the MTKDroidsTool version 2.5.3.
- Enter your original IMEI
- Click Replace
- Reboot your phone
1. Make sure you have MTKDROIDSTOOL version 2.4.8 or version 2.5.3 (you can search it in google)
I hope this tutorial help you. Please drop a comment if something is not clear to you.
Available link for download
Thursday, September 8, 2016
How to Flash Custom Recovery for Samsung Galaxy S4 Models
How to Flash Custom Recovery for Samsung Galaxy S4 Models

Custom recovery will allow you to perform some powerful actions, like full backup / restore, flash custom ROMS, Mods, themes, apps, install updates to Android operating system manually and many other features.
Flashing/installation instructions :
It wont wipe any data but its recommended to backup your important data first just in case of this process corrupt your data
1- Download the correct recovery file for your device (Link below) or any recovery you prefer
2- Download and install Samsung mobile driver (Link below)
3- Unzip the downloaded file only one time
4- Run "Odin3" as administrator
5- Click on PDA button and browse to the unzipped file.tar that you extracted


7 - Shut down your device
8 - Put your device into Download Mode (Volume Down + Home + Power)
9 - Volume up to continue

11 - Make sure re-partition is NOT SELECTED [Very important]

12 - Click Start and wait a few seconds.

- Disconnect your device and check the custom recovery

YT Video link : http://www.youtube.com/watch?v=GlPOuqV9rGY
Notes :- I am not responsible if something happened to your device (use this AT YOUR OWN RISK)
- Skip step 2 if you already have Samsung Kies or Samsung mobile driver on your PC
- This stuff is made for Samsung galaxy S4 devices (AT&T, Cricket, GT-I9500, Canada/Bell, Sprint, T-Mobile, US Cellular, Verizon and GT-I9505)
- Some devices have a locked bootloader, unlock it first before flashing the recovery file
- I just converted "*.img" files from clockworkmod website to "*.tar" file which you can flash by Odin3
- (You can convert it by following this easy TUT : How to Convert *.img to *.tar.md5 )
- Official CMW website www.clockworkmod.com
- Download and Install Kies or Samsung mobile driver, if you didnt get a sign in ID:COM or "Added" in message box
- Odin3_v3.04 HERE, v3.07 HERE, v3.09 HERE
- Latest Samsung Mobile Driver Here
- Latest Samsung Kies Here
- Samsung Galaxy S4 (AT&T) Ver 6.0.3.2 / Ver 6.0.4.4
- Samsung Galaxy S4 (Cricket) Ver 6.0.3.2 / Ver 6.0.4.4
- Samsung Galaxy S4 (Canada/Bell) Ver 6.0.3.2/ Ver 6.0.4.4
- Samsung Galaxy S4 (Sprint) Ver 6.0.3.2/ Ver 6.0.4.4
- Samsung Galaxy S4 (T-Mobile) Ver 6.0.3.2/ Ver 6.0.4.4
- Samsung Galaxy S4 (US Cellular) Ver 6.0.3.2/ Ver 6.0.4.4
- Samsung Galaxy S4 (Verizon) Ver 6.0.3.2/ Ver 6.0.4.4
- Samsung Galaxy S4 LTE (GT-I9505) Ver 6.0.3.3/ Ver 6.0.4.4
- Samsung Galaxy S4 (GT-I9500) Ver 6.0.3.2
- Samsung Galaxy S4 (C Spire) Ver 6.0.4.4
Available link for download
Saturday, August 27, 2016
custom rom list for samsung core 2
custom rom list for samsung core 2
IN THIS ROMS PROVIDED BY ME.I HAVE NOT DEVELOPED ANY ROM IN THIS LIST.
1.Lolicore 2- download lolicore 2 rom
2.cm 11(cynogen 11)- download more cm 11

3.rom note 5experience rom(5.0.2) download note 5 rom
4.sandroid rom download sandroid rom
5.Lolipop mod download lolipop mod rom
6.Marshmallow rom download marshmallow rom

7.Speed rom Download Speed rom

1.Lolicore 2- download lolicore 2 rom
2.cm 11(cynogen 11)- download more cm 11
3.rom note 5experience rom(5.0.2) download note 5 rom
4.sandroid rom download sandroid rom
5.Lolipop mod download lolipop mod rom
6.Marshmallow rom download marshmallow rom
7.Speed rom Download Speed rom
Available link for download
Subscribe to:
Posts (Atom)