Showing posts with label one. Show all posts
Showing posts with label one. Show all posts
Saturday, October 29, 2016
How to Unbrick Samsung Android Phones with One Click UnBrick
How to Unbrick Samsung Android Phones with One Click UnBrick

Here is a good news for You – A developer come up with a software called One-Click UnBrick for Samsung android phones. This small utility uses Odin to repair our Samsung phones. Almost all Samsung phones with android éclair and above can be repair with this tool (few exceptions – it is working on some Android 1.5 too)
Requirements
- Install Samsung USB Driver for Mobile Phones on the computer.
- Install Java Runtime Environment (JRE) on the computer.
- Download One-Click UnBrick tool.
Complete Step-By-Step Instructions:
- Extract the "One-Click.jar" file using WinRAR/7-Zip/WinZip or any other extracting tool. Now you will get a "OneClick" folder.
- Copy the "OneClick.jar" file and paste it into the "OneClickheimdalloneclick esourcesHeimdallPackage" folder.
- Right-click on the "oneclickloader.exe" file and choose "Run as Administrator".
- Proceed with the installation of Heimdall.
- After the installation is complete, you will see the the One-Click UnBrick interface.
- Connect the phone to computer via USB and click on the "unsoft brick" button to recover your bricked Samsung android phone.


Available link for download
Friday, October 28, 2016
Alcatel One Touch 4033E stock rom firmware to unbrick your phone
Alcatel One Touch 4033E stock rom firmware to unbrick your phone
Hi,
This firmware is for Alcatel One Touch 4033E, I already tried and tested this file.
This firmware is not yet rooted, you can use your favorite rooting application for PC such as vRoot/iRoot/Kingoroot or you can use an APK file which is Kingroot to root your device.
This firmware is not yet rooted, you can use your favorite rooting application for PC such as vRoot/iRoot/Kingoroot or you can use an APK file which is Kingroot to root your device.
1. Bootloop
2. Damaged System UI
3. TP Upgrade only
4. Dead phone but it is detected in computer
5. Remove Gmail Account / Password / Pattern Lock (Alternative Way)
6. Privacy Protection Password Lock up
"DOWNLOAD THESE FILES"
Firmware Here -->Alcatel One Touch 4033e Part 1
Firmware Here -->Alcatel One Touch 4033e Part 2
Firmware Here -->Alcatel One Touch 4033e Part 3
Firmware Here -->Alcatel One Touch 4033e Part 4
VCOM Driver -->VCOM Manual
Alternative Driver --> AutoInstaller
Alternative Driver --> AutoInstaller
SPFlashTool --> LatestVersion
"Use WinRar or 7zip to extract the firmware"
"Extract the files to your desired folder"
"If you encounter error in flashtool, use different version of it."
"Extract the files to your desired folder"
"If you encounter error in flashtool, use different version of it."
"I suggest to use 32bit Windows OS for compatibility of the driver"
"You can also use 64bit version, just disable driver signing or driver signature before installing the driver."
Installing Driver with AutoInstaller
First try the Alternative Driver, which is the AutoInstaller. Just open the install.exe then it will automatically install the driver. To fully check if the driver is correctly installed in your computer.
Follow these steps:
- Turn off your phone (always powered off is a must)
- Press and hold volume up or down, or you can simple press the two button.
- Insert your USB cable without releasing the VOLUME button(s).
- In your computer, it must detect your phone and it will install the MTK Preloader or Mediatek USB VCOM driver.
- Repeat 1 to 4 if it does not detect your phone.
- If MTK Preloader/Mediatek USB VCOM Driver is installed you are good to go in flashing your phone ^_^
Reference Video using Driver Auto Installer (watch in HD)
Installing Manually using VCOM Driver
When installing it manually your phone must be turned off, then connect it to your computer/laptop while pressing VOLUME UP or VOLUME DOWN. This will detect and look for the driver.

1. This is the first time that you will connect your phone and it will search for the correct driver.

2. Check include this location ... ... and click on browse. Look for USB VCOM Driver and Click on 2K_XP_COM folder if you are using Windows XP or Win7 for Windows 7 and then press OK when you are done picking the right folder for the driver.

3. If the driver is successfully installed MediaTek DA USB VCOM will appear in the New Hardware Wizard.
Video Installing VCOM Driver (please watch in HD)
"Your Phone must be turned off when you are ready to connect and flash your phone"
Flashing1. Launch FlashTool (flash_tool.exe)
2. In Flashtool, Click on Scatter-Loading, and load your scatter file. (see example below)
Reference Video Using FlashTool version 5.xxx (watch in HD)
3. After you load the file FILL CUSTPACK, MOBILE_INFO, and other file. UNCHECK PRELOADER only (Never flash preloader and if available in firmware), If you cannot proceed in flashing without PRELOADER include PRELOADER. Proceed at your own risk, press Press Download to Flash your Phone.
4. After you press Download Follow these steps
Some workarounds:
- Turn off your phone (always powered off is a must)
- Press and HOLD volume UP or Down or you can simply press it simultaneously
- Insert your USB cable without releasing the VOLUME button(s).
- Keep on repeating until Flashtool detected your phone.
"Hard reset your phone after flashing"
Some workarounds:
If you encounter PMT_Changed error here is what you do:
In Latest version of Flashtool
- PMT_CHANGED error occur when firmware is not compatible with your phone. Sometimes your phone has a different board version. You should check it too, if your firmware is compatible with your phone.
- Try Firmware upgrade
- Try different version of flashtool
- Try to set Format All + Download
- Or try Manual Format first then Download.
If you encounter Privacy Protection Password:
- Open flash_tool.exe
- Load the scatter file
- Goto Format Tab
- Click on Format except bootloader
- Press Play/Start Icon
- Then remove battery
- Insert the battery again
- Insert the USB cable (you should hear a beep on your computer, and it should proceed in formatting.)
- After done formatting proceed in Flashing.
- Goto Download tab (I assume that you loaded the scatter file already)
- Uncheck PRELOADER (this is very important)
- Press Download
- Then remove battery
- Insert Battery again
- Insert the USB cable (you should hear a beep on your computer, and it should proceed in flashing or downloading the firmware in your phone.)
- Power ON the phone after flashing.
- Restore your IMEI.
For Invalid IMEI (Does not work in MT6571 SoC):
- Root your phone via vRoot/iRoot/Kingoroot or your preferred method in rooting you device. Your phone must be rooted first.
- Download MTKDroidsTool version 2.4.8 and version 2.5.3
- Enable your USB debugging in Developer Option (you also need this in rooting your phone via PC)
- Okay in your PC -- Open MTKDroidstool version 2.4.8 (Mtkdroidstool.exe) first. Make sure that you connected your phone already.
- Still in Mtkdroidstool -- Click ROOT
- In your phone -- A pop up dialogue will appear, just grant or allow it.
- In your PC -- If root shell is granted/allowed, Click in IMEI/NVRAM tab. If it is grayed out this is the time when you open the MTKDroidsTool version 2.5.3.
- Enter your original IMEI
- Click Replace
- Reboot your phone
1. Make sure you have MTKDROIDSTOOL version 2.4.8 or version 2.5.3 (you can search it in google)
I hope this tutorial help you. Please drop a comment if something is not clear to you.
Available link for download
Monday, October 24, 2016
Alcatel One Touch Star 6010x firmware stock rom to unbrick your phone
Alcatel One Touch Star 6010x firmware stock rom to unbrick your phone
Hi,
This firmware is for Alcatel One Touch Star 6010x, I already tried and tested this file.

This firmware is not yet rooted, you can use your favorite rooting application for PC such as vRoot/iRoot/Kingoroot or you can use an APK file which is Kingroot to root your device.
This firmware is not yet rooted, you can use your favorite rooting application for PC such as vRoot/iRoot/Kingoroot or you can use an APK file which is Kingroot to root your device.
1. Bootloop
2. Damaged System UI
3. TP Upgrade only
4. Dead phone but it is detected in computer
5. Remove Gmail Account / Password / Pattern Lock (Alternative Way)
6. Privacy Protection Password Lock up
"DOWNLOAD THESE FILES"
Firmware Here -->Alcatel One Touch Star 6010x
VCOM Driver -->VCOM Manual
Alternative Driver --> AutoInstaller
Alternative Driver --> AutoInstaller
SPFlashTool --> LatestVersion
"Use WinRar or 7zip to extract the firmware"
"Extract the files to your desired folder"
"If you encounter error in flashtool, use different version of it."
"Extract the files to your desired folder"
"If you encounter error in flashtool, use different version of it."
"I suggest to use 32bit Windows OS for compatibility of the driver"
"You can also use 64bit version, just disable driver signing or driver signature before installing the driver."
Installing Driver with AutoInstaller
First try the Alternative Driver, which is the AutoInstaller. Just open the install.exe then it will automatically install the driver. To fully check if the driver is correctly installed in your computer.
Follow these steps:
- Turn off your phone (always powered off is a must)
- Press and hold volume up or down, or you can simple press the two button.
- Insert your USB cable without releasing the VOLUME button(s).
- In your computer, it must detect your phone and it will install the MTK Preloader or Mediatek USB VCOM driver.
- Repeat 1 to 4 if it does not detect your phone.
- If MTK Preloader/Mediatek USB VCOM Driver is installed you are good to go in flashing your phone ^_^
Reference Video using Driver Auto Installer (watch in HD)
Installing Manually using VCOM Driver
When installing it manually your phone must be turned off, then connect it to your computer/laptop while pressing VOLUME UP or VOLUME DOWN. This will detect and look for the driver.
1. This is the first time that you will connect your phone and it will search for the correct driver.
2. Check include this location ... ... and click on browse. Look for USB VCOM Driver and Click on 2K_XP_COM folder if you are using Windows XP or Win7 for Windows 7 and then press OK when you are done picking the right folder for the driver.
3. If the driver is successfully installed MediaTek DA USB VCOM will appear in the New Hardware Wizard.
Video Installing VCOM Driver (please watch in HD)
"Your Phone must be turned off when you are ready to connect and flash your phone"
Flashing1. Launch FlashTool (flash_tool.exe)
2. In Flashtool, Click on Scatter-Loading, and load your scatter file. (see example below)
Reference Video Using FlashTool version 5.xxx (watch in HD)
3. After you load the file, FILL CUSTPACK, MOBILE_INFO, and other file. UNCHECK PRELOADER only (Never flash preloader and if available in firmware), If you cannot proceed in flashing without PRELOADER include PRELOADER. Proceed at your own risk, press Press Download to Flash your Phone.
4. After you press Download Follow these steps
Some workarounds:
- Turn off your phone (always powered off is a must)
- Press and HOLD volume UP or Down or you can simply press it simultaneously
- Insert your USB cable without releasing the VOLUME button(s).
- Keep on repeating until Flashtool detected your phone.
"Hard reset your phone after flashing"
Some workarounds:
If you encounter PMT_Changed error here is what you do:
In Latest version of Flashtool
- PMT_CHANGED error occur when firmware is not compatible with your phone. Sometimes your phone has a different board version. You should check it too, if your firmware is compatible with your phone.
- Try Firmware upgrade
- Try different version of flashtool
- Try to set Format All + Download
- Or try Manual Format first then Download.
If you encounter Privacy Protection Password:
- Open flash_tool.exe
- Load the scatter file
- Goto Format Tab
- Click on Format except bootloader
- Press Play/Start Icon
- Then remove battery
- Insert the battery again
- Insert the USB cable (you should hear a beep on your computer, and it should proceed in formatting.)
- After done formatting proceed in Flashing.
- Goto Download tab (I assume that you loaded the scatter file already)
- Uncheck PRELOADER (this is very important)
- Press Download
- Then remove battery
- Insert Battery again
- Insert the USB cable (you should hear a beep on your computer, and it should proceed in flashing or downloading the firmware in your phone.)
- Power ON the phone after flashing.
- Restore your IMEI.
For Invalid IMEI (Does not work in MT6571 SoC):
- Root your phone via vRoot/iRoot/Kingoroot or your preferred method in rooting you device. Your phone must be rooted first.
- Download MTKDroidsTool version 2.4.8 and version 2.5.3
- Enable your USB debugging in Developer Option (you also need this in rooting your phone via PC)
- Okay in your PC -- Open MTKDroidstool version 2.4.8 (Mtkdroidstool.exe) first. Make sure that you connected your phone already.
- Still in Mtkdroidstool -- Click ROOT
- In your phone -- A pop up dialogue will appear, just grant or allow it.
- In your PC -- If root shell is granted/allowed, Click in IMEI/NVRAM tab. If it is grayed out this is the time when you open the MTKDroidsTool version 2.5.3.
- Enter your original IMEI
- Click Replace
- Reboot your phone
1. Make sure you have MTKDROIDSTOOL version 2.4.8 or version 2.5.3 (you can search it in google)
I hope this tutorial help you. Please drop a comment if something is not clear to you.
Available link for download
Monday, October 17, 2016
Alcatel One Touch Pop C7 7040D stock rom firmware to unbrick your phone
Alcatel One Touch Pop C7 7040D stock rom firmware to unbrick your phone
Hi,
This firmware is for Alcatel One Touch Pop C7 7040D, I already tried this file and its working.

This firmware is not yet rooted, you can use your favorite rooting application for PC such as vRoot/iRoot/Kingoroot or you can use an APK file which is Kingroot to root your device.
All pictures below are just an example.
This firmware is not yet rooted, you can use your favorite rooting application for PC such as vRoot/iRoot/Kingoroot or you can use an APK file which is Kingroot to root your device.
All pictures below are just an example.
1. Bootloop
2. Damaged System UI
3. TP Upgrade only
4. Dead phone but it is detected in computer
5. Remove Gmail Account / Password / Pattern Lock (Alternative Way)
6. Privacy Protection Password Lock up
"DOWNLOAD THESE FILES"
Firmware Here -->Alcatel One Touch Pop C7 7040D Part 1
Firmware Here -->Alcatel One Touch Pop C7 7040D Part 2
Firmware Here -->Alcatel One Touch Pop C7 7040D Part 3
Firmware Here -->Alcatel One Touch Pop C7 7040D Part 4
VCOM Driver -->VCOM Manual
Alternative Driver --> AutoInstaller
Alternative Driver --> AutoInstaller
SPFlashTool --> LatestVersion
"Use WinRar or 7zip to extract the firmware"
"Extract the files to your desired folder"
"If you encounter error in flashtool, use different version of it."
"Extract the files to your desired folder"
"If you encounter error in flashtool, use different version of it."
"I suggest to use 32bit Windows OS for compatibility of the driver"
"You can also use 64bit version, just disable driver signing or driver signature before installing the driver."
Installing Driver with AutoInstaller
First try the Alternative Driver, which is the AutoInstaller. Just open the install.exe then it will automatically install the driver. To fully check if the driver is correctly installed in your computer.
Follow these steps:
- Turn off your phone (always powered off is a must)
- Press and hold volume up or down, or you can simple press the two button.
- Insert your USB cable without releasing the VOLUME button(s).
- In your computer, it must detect your phone and it will install the MTK Preloader or Mediatek USB VCOM driver.
- Repeat 1 to 4 if it does not detect your phone.
- If MTK Preloader/Mediatek USB VCOM Driver is installed you are good to go in flashing your phone ^_^
Reference Video using Driver Auto Installer (watch in HD)
Installing Manually using VCOM Driver
When installing it manually your phone must be turned off, then connect it to your computer/laptop while pressing VOLUME UP or VOLUME DOWN. This will detect and look for the driver.
1. This is the first time that you will connect your phone and it will search for the correct driver.
2. Check include this location ... ... and click on browse. Look for USB VCOM Driver and Click on 2K_XP_COM folder if you are using Windows XP or Win7 for Windows 7 and then press OK when you are done picking the right folder for the driver.
3. If the driver is successfully installed MediaTek DA USB VCOM will appear in the New Hardware Wizard.
Video Installing VCOM Driver (please watch in HD)
"Your Phone must be turned off when you are ready to connect and flash your phone"
Flashing1. Launch FlashTool (flash_tool.exe)
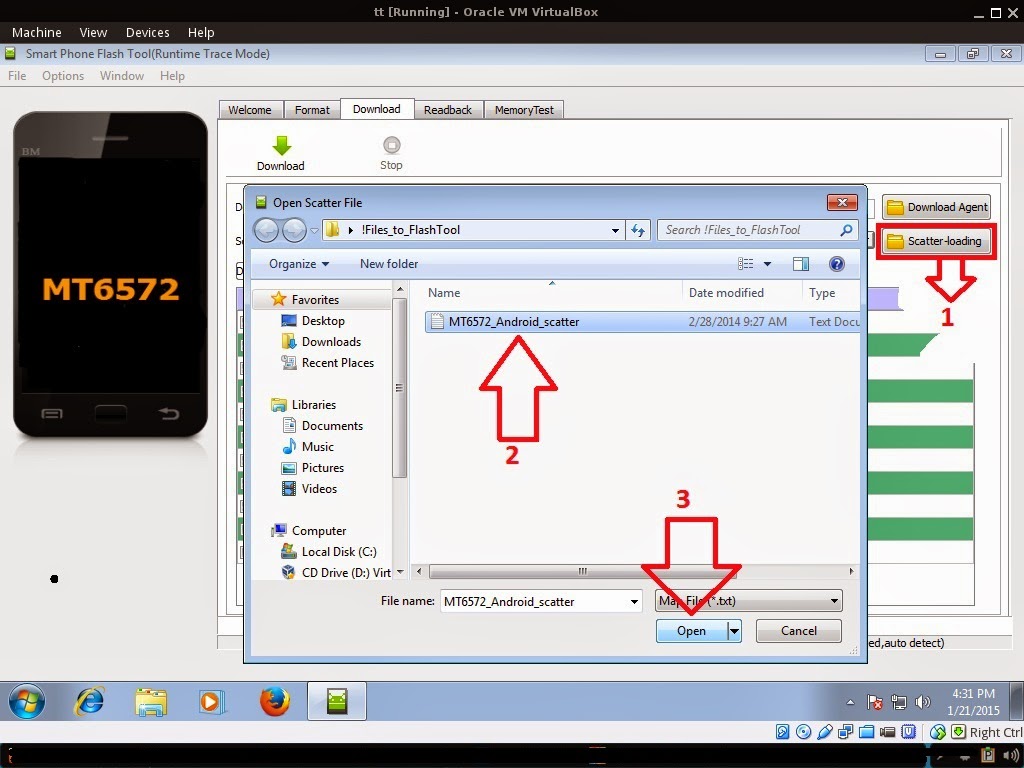
2. In Flashtool, Click on Scatter-Loading, and load your scatter file. (see example below)
Reference Video Using FlashTool version 5.xxx (watch in HD)
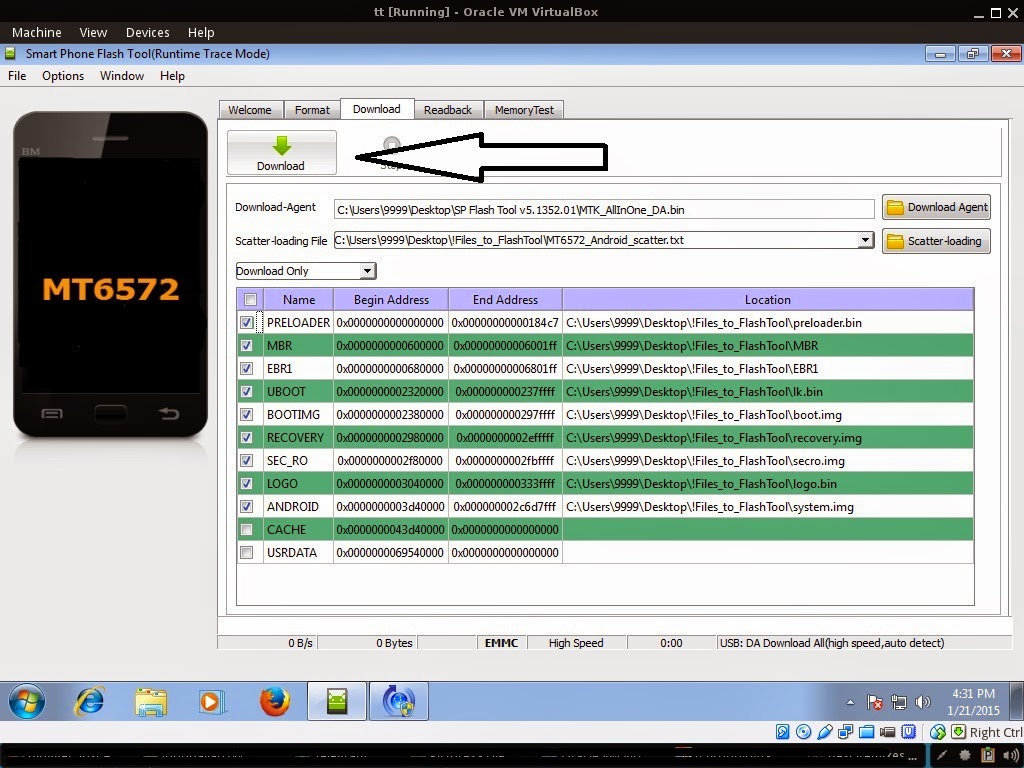
3. After you load the file, FILL CUSTPACK, MOBILE_INFO, and other file. UNCHECK PRELOADER only (Never flash preloader), If you cannot proceed in flashing without PRELOADER include PRELOADER. Proceed at your own risk, press Press Download to Flash your Phone.
4. After you press Download Follow these steps
Some workarounds:
- Turn off your phone (always powered off is a must)
- Press and HOLD volume UP or Down or you can simply press it simultaneously
- Insert your USB cable without releasing the VOLUME button(s).
- Keep on repeating until Flashtool detected your phone.
"Hard reset your phone after flashing"
Some workarounds:
If you encounter PMT_Changed error here is what you do:
In Latest version of Flashtool
- PMT_CHANGED error occur when firmware is not compatible with your phone. Sometimes your phone has a different board version. You should check it too, if your firmware is compatible with your phone.
- Try Firmware upgrade
- Try different version of flashtool
- Try to set Format All + Download
- Or try Manual Format first then Download.
If you encounter Privacy Protection Password:
- Open flash_tool.exe
- Load the scatter file
- Goto Format Tab
- Click on Format except bootloader
- Press Play/Start Icon
- Then remove battery
- Insert the battery again
- Insert the USB cable (you should hear a beep on your computer, and it should proceed in formatting.)
- After done formatting proceed in Flashing.
- Goto Download tab (I assume that you loaded the scatter file already)
- Uncheck PRELOADER (this is very important)
- Press Download
- Then remove battery
- Insert Battery again
- Insert the USB cable (you should hear a beep on your computer, and it should proceed in flashing or downloading the firmware in your phone.)
- Power ON the phone after flashing.
- Restore your IMEI.
For Invalid IMEI (Does not work in MT6571 SoC):
- Root your phone via vRoot/iRoot/Kingoroot or your preferred method in rooting you device. Your phone must be rooted first.
- Download MTKDroidsTool version 2.4.8 and version 2.5.3
- Enable your USB debugging in Developer Option (you also need this in rooting your phone via PC)
- Okay in your PC -- Open MTKDroidstool version 2.4.8 (Mtkdroidstool.exe) first. Make sure that you connected your phone already.
- Still in Mtkdroidstool -- Click ROOT
- In your phone -- A pop up dialogue will appear, just grant or allow it.
- In your PC -- If root shell is granted/allowed, Click in IMEI/NVRAM tab. If it is grayed out this is the time when you open the MTKDroidsTool version 2.5.3.
- Enter your original IMEI
- Click Replace
- Reboot your phone
1. Make sure you have MTKDROIDSTOOL version 2.4.8 or version 2.5.3 (you can search it in google)
I hope this tutorial help you. Please drop a comment if something is not clear to you.
Available link for download
Tuesday, October 4, 2016
How to One Click Unlock Bootloader Root Google Nexus 5 CF Auto Root
How to One Click Unlock Bootloader Root Google Nexus 5 CF Auto Root

CF-Auto-Root does not include a custom kernel, it will keep your nexus 5 as close to stock as possible with root access.
Requirements :
- Google nexus 5
- Extracted CF-Auto-Root file.
- Installed Google USB driver.
- Windows PC.
- Backup all data before starting rooting process, it will wipe all your data.
- Turn off your nexus 5 and put it into fastboot mode (power + vol down) buttons.
- Double click "root-windows.bat" for windows and press any key on your computers keyboard to continue.
- Connect your device to PC via USB cable (wait until your PC detect it).
- Press vol up to choose "unlock bootloader", then power button to confirm.
- Your nexus 5 will erase the data, then reboot into a screen which display a red Android logo.
- Wait a few minutes until your device finish configuration.
- You will see SuperSU app in your device app drawer


YT video link : http://www.youtube.com/watch?v=GAbSbobwX6s
Notes :- This process will void your devices warranty
- CF-Auto-Root method will unlock bootloader, install SuperSU and binary, NO custom recovery.
- Use it at your own risk
- Credit goes to "chainfire" cf-auto-root developer, main thread.
How to install USB driver for Nexus phones ...
- Download and unzip the downloaded driver file "latest_usb_driver_windows.zip".
- Connect your nexus to PC
- Right click on my computer and choose "Manage"
- Click on "Device Manager" and you should see your device name, right click on it and choose "Update Driver Software..."
- Browse your computer for the extracted folder "usb_driver".
Downloads :
- CF-Auto-Root file for Nexus 5 HERE
- Google USB driver HERE
Available link for download
Sunday, October 2, 2016
How to install Two instagram in to one Device
How to install Two instagram in to one Device

Instwogram doesnt offer any additional features compared to the classic Instagram. This means that you wont find anything new in it, just the possibility of having two accounts open at the same time, uploading pictures to both or either one of them.
Instwogram is a pretty useful app for anyone who has two Instagram accounts; it lets you upload your pictures without having to log in and out all the time.
Features Of Instwogram :
- Now you can post pictures.
- Also you can post videos
- Follow and Un-follow easily.
- Add location to posts.
- You can also register new account.
- All new click-able links feature.
- Download videos and pictures in one click.
- Direct sharing of posts.
Requirements For Intwogram :
- Android version 2.2+
- Root access only if you want to use Add-on.
 |
| Download |
Available link for download
Subscribe to:
Posts (Atom)