Monday, October 31, 2016
Z3X Samsung tool 16 5 Daily Update Second Warm up
Z3X Samsung tool 16 5 Daily Update Second Warm up
Added:
- support GT-S7580 (Direct codereading/unlock/imei repair, flashing) - first in the world
- support GT-S7582 (Direct codereading/unlock/imei repair, flashing) - first in the world
- support GT-S7392 (Direct codereading/unlock/imei repair, flashing)
p.s. bug report thread and wanted adding phones
Available link for download

Saturday, October 15, 2016
Nokia C2 02 Voluem Up Down Keys Not Working Problem Solution Jumpers
Nokia C2 02 Voluem Up Down Keys Not Working Problem Solution Jumpers
2-Nokia C2-02 Volume Down Key is Not Working.
Tools:-
1-Hot Air is required.
2-Solding iron is required.
3-Skrue driver keys.
4-Electronics cleaner.
5-Four leg On of Switch ( Volume Key Switch ).
6-old board of Nokia C2-02 if a few parts are damage in this board.So that they can be replaced.
nokia 100 not charging problem solution

Solution:-
If Volume Up or Down key is not working in Nokia C2-02 then it can be the cause of Volume Switch or Resistance near by it.
So disassemble mobile phone and check whole mother board.
If there is some rust or carbon clean it with electronics cleaner and apply some heat so that it can be dry.
Check these tracks as shown in red and green lines in above diagram.
If some prints are missing or a few parts are damage apply jumpers or replace damaged parts.
If Volume Switch is damage or broken then replace it with new one.
Warnings:
Do not apply much heat it can be harm for your skin and mobile phone.
Try that board get fully dry.
When you are removing old volume switch make sure you will not damage prints from mother board so remove it when solding iron is too much hot.Or remove it with hot air.
Available link for download
Monday, October 10, 2016
Nokia C2 07 Voluem Up Down Keys Not Working Problem Solution Jumpers
Nokia C2 07 Voluem Up Down Keys Not Working Problem Solution Jumpers
2-Nokia C2-07 Volume Down Key is Not Working.
Tools:-
1-Hot Air is required.
2-Solding iron is required.
3-Skrue driver keys.
4-Electronics cleaner.
5-Four leg On of Switch ( Volume Key Switch ).
6-old board of Nokia C2-07 if a few parts are damage in this board.So that they can be replaced.
Nokia C2-07 Ringer Problem Solution Jumper Ways

Solution:-
If Volume Up or Down key is not working in Nokia C2-07 then it can be the cause of Volume Switch or Resistance near by it.
So disassemble mobile phone and check whole mother board.
If there is some rust or carbon clean it with electronics cleaner and apply some heat so that it can be dry.
Check these tracks as shown in red and green lines in above diagram.
If some prints are missing or a few parts are damage apply jumpers or replace damaged parts.
If Volume Switch is damage or broken then replace it with new one.
Warnings:
Do not apply much heat it can be harm for your skin and mobile phone.
Try that board get fully dry.
When you are removing old volume switch make sure you will not damage prints from mother board so remove it when solding iron is too much hot.Or remove it with hot air.
Available link for download
Tuesday, September 13, 2016
Star Mobile UP HD firmware stock rom to unbrick your phone
Star Mobile UP HD firmware stock rom to unbrick your phone
Hi,
The firmware is already rooted. You can also choose if you want to install CWM, TWRP or Stock Recovery.

The firmware version is version 06, you may need to uninstall the root access. To update to the latest version which is version 10. If you do not remove the root access you might brick your phone.
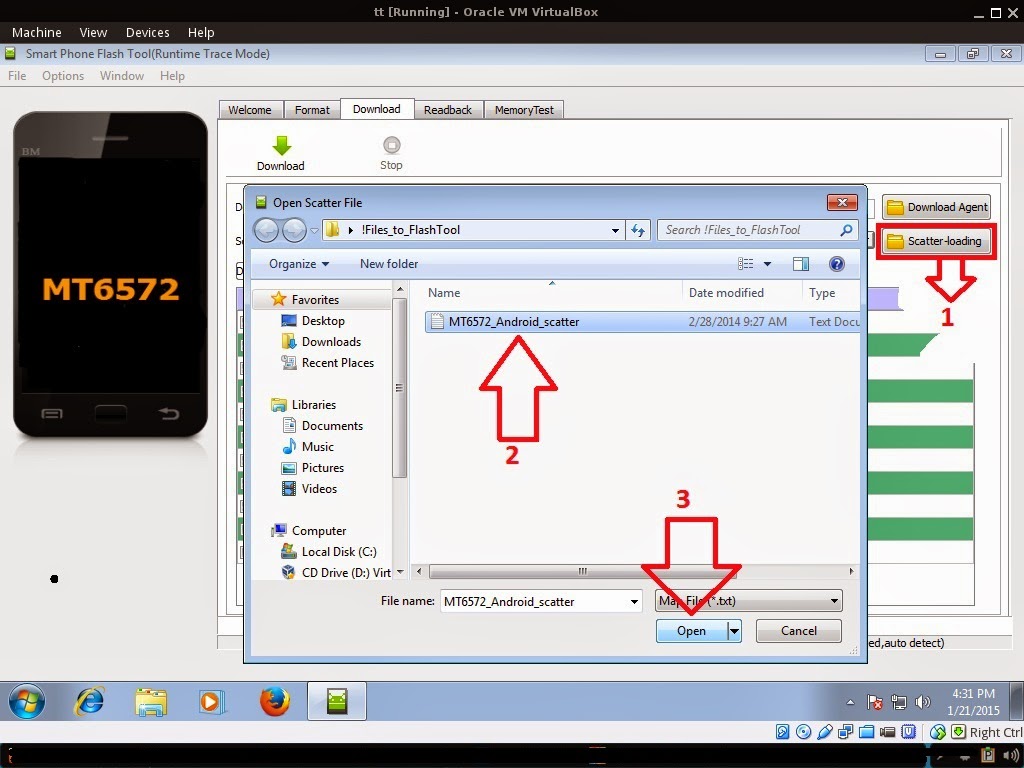
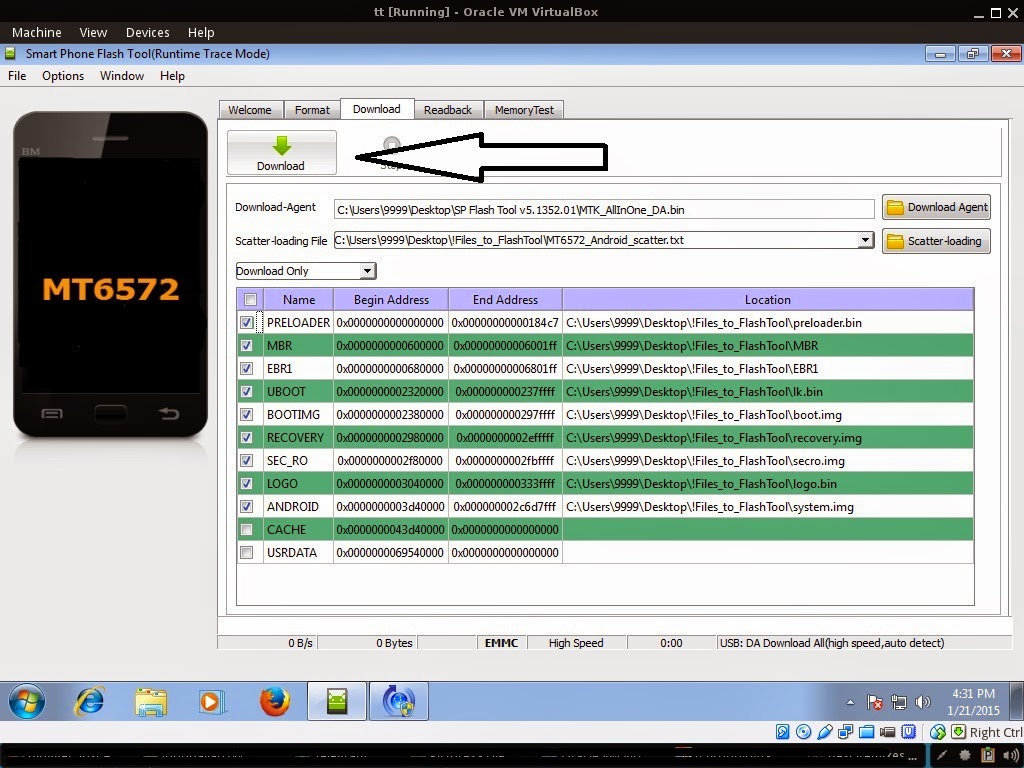
Some pictures below are just an example of my previous post. Replace scatter file with the correct firmware that you downloaded.
1. Bootloop
2. Damaged System UI
3. TP Upgrade only
4. Dead phone but it is detected in computer
5. Remove Gmail Account / Password / Pattern Lock (Alternative Way)
6. Privacy Protection Password Lock up
"DOWNLOAD THESE FILES"
Firmware Here -->Star Mobile UP HD Part 1
Firmware Here -->Star Mobile UP HD Part 2
Firmware Here -->Star Mobile UP HD Part 3
Firmware Here -->Star Mobile UP HD Part 4
Firmware Here -->Star Mobile UP HD Part 5
VCOM Driver -->VCOM Manual
"Extract the files to your desired folder"
"If you encounter error in flashtool, use different version of it."
"I suggest to use 32bit Windows OS for compatibility of the driver"
"You can also use 64bit version, just disable driver signing or driver signature before installing the driver."
Installing Driver with AutoInstaller
First try the Alternative Driver, which is the AutoInstaller. Just open the install.exe then it will automatically install the driver. To fully check if the driver is correctly installed in your computer.
Follow these steps:
- Turn off your phone (always powered off is a must)
- Press and hold volume up or down, or you can simple press the two button.
- Insert your USB cable without releasing the VOLUME button(s).
- In your computer, it must detect your phone and it will install the MTK Preloader or Mediatek USB VCOM driver.
- Repeat 1 to 4 if it does not detect your phone.
- If MTK Preloader/Mediatek USB VCOM Driver is installed you are good to go in flashing your phone ^_^
Reference Video using Driver Auto Installer (watch in HD)
Installing Manually using VCOM Driver

1. This is the first time that you will connect your phone and it will search for the correct driver.


3. If the driver is successfully installed MediaTek DA USB VCOM will appear in the New Hardware Wizard.
 |
| Example only, May differ depending on phone. |
Reference Video Using FlashTool version 5.xxx (watch in HD)
3. After you load the file, UNCHECK PRELOADER and DSP only (Never flash preloader and DSP if available in firmware) If you cant proceed flashing without these two files then proceed at your own risk, press Press Download to Flash your Phone.
- Turn off your phone (always powered off is a must)
- Press and HOLD volume UP or Down or you can simply press it simultaneously
- Insert your USB cable without releasing the VOLUME button(s).
- Keep on repeating until Flashtool detected your phone.
*** For non-removable battery just press the power button until the phone power up. Some phones have a reset button. You can press it to reset your phone.
Some workarounds:
- PMT_CHANGED error occur when firmware is not compatible with your phone. Sometimes your phone has a different board version. You should check it too, if your firmware is compatible with your phone.
- Try Firmware upgrade
- Try different version of flashtool
- Try to set Format All + Download
- Or try Manual Format first then Download.
If you encounter Privacy Protection Password:
- Open flash_tool.exe
- Load the scatter file
- Goto Format Tab
- Click on Format except bootloader
- Press Play/Start Icon
- Then remove battery
- Insert the battery again
- Insert the USB cable (you should hear a beep on your computer, and it should proceed in formatting.)
- After done formatting proceed in Flashing.
- Goto Download tab (I assume that you loaded the scatter file already)
- Uncheck PRELOADER (this is very important)
- Press Download
- Then remove battery
- Insert Battery again
- Insert the USB cable (you should hear a beep on your computer, and it should proceed in flashing or downloading the firmware in your phone.)
- Power ON the phone after flashing.
- Restore your IMEI.
For Invalid IMEI (Does not work in MT6571 SoC):
- Root your phone via vRoot/iRoot/Kingoroot or your preferred method in rooting you device. Your phone must be rooted first.
- Download MTKDroidsTool version 2.4.8 and version 2.5.3
- Enable your USB debugging in Developer Option (you also need this in rooting your phone via PC)
- Okay in your PC -- Open MTKDroidstool version 2.4.8 (Mtkdroidstool.exe) first. Make sure that you connected your phone already.
- Still in Mtkdroidstool -- Click ROOT
- In your phone -- A pop up dialogue will appear, just grant or allow it.
- In your PC -- If root shell is granted/allowed, Click in IMEI/NVRAM tab. If it is grayed out this is the time when you open the MTKDroidsTool version 2.5.3.
- Enter your original IMEI
- Click Replace
- Reboot your phone
1. Make sure you have MTKDROIDSTOOL version 2.4.8 or version 2.5.3 (you can search it in google)
I hope this tutorial help you. Please drop a comment if something is not clear to you.
Tested by:
ME
Available link for download
Saturday, August 20, 2016
OfferUp Buy Sell Offer Up 2 2 8 APK Download for Android
OfferUp Buy Sell Offer Up 2 2 8 APK Download for Android

Direct Download OfferUp - Buy. Sell. Offer Up 2.2.8 APK Download for Android (com.offerup) The newest and lastet version of this Apps is 2.2.8
You are about to download the OfferUp - Buy. Sell. Offer Up 2.2.8 apk file for Android 4.0.3 OfferUp - Buy. Sell. Offer Up is a free Shopping Apps This apk does not include any cheat, crack, unlimited gold, ads….or any changes.
Choose one of the server location below to start to get the apk file for OfferUp - Buy. Sell. Offer Up, move the file to your Android phones SD card and then use one file manager you prefer to browse & install it. Enjoy.
Please be aware that ApkPlz only share the original and free apk installer for OfferUp - Buy. Sell. Offer Up 2.2.8 WITHOUT ANY cheat, crack, unlimited gold patch or any other modifications.
All the apps & games here are for home or personal use only. If any apk download infringes your copyright,
Click here to download OfferUp - Buy. Sell. Offer Up 2.2.8 apk for android
Available link for download
Monday, August 15, 2016
Set up Selenium Grid2 on Windows for testing with IE Safari Chrome Opera and Firefox
Set up Selenium Grid2 on Windows for testing with IE Safari Chrome Opera and Firefox
Update: If you have an Amazon Web Services (AWS) account, heres a nice CloudFormation template that will do everything for you!
~~~~~~~~~~~
Confused by Selenium? Youre not the only one! There are many Selenium guides out there but I couldnt find any that provided a complete tutorial for installing it on Windows for IE, Safari, Chrome, and Firefox testing so I thought Id document my process with Windows Server 2008 R2:
1. login to Windows with an account that has administrator rights
2. if not already open, click on Start and search for Server Manager to open; then click on Configure IE ESC link (in the Security Information section) and turn off IE ESC for both Administrators and Users
3. if not already done, use this guide to show file extensions and hidden folders
4. install Java
5. install Chrome
6. install Firefox
7.
8. create a folder in C: called selenium and download http://selenium-release.storage.googleapis.com/2.41/selenium-server-standalone-2.41.0.jar into it
9. download and extract the InternetExplorerDriver and ChromeDriver drivers into the C:selenium folder (Notes: Use the 32-bit versions even if your Windows OS is 64-bit because even if your OS is 64-bit, browsers run as 32-bit. The Firefox and Safari drivers are already included in the selenium-server-standalone.jar file as pre-built extensions. Opera uses the same engine as Chrome so you dont have to run separate tests for it.)
10. click Start and search for Edit the system environment variables to open the System Properties dialog, then click the Environment Variables... button, then click on the Path variable in the System variables list and click the Edit... button. At the end of the Variable value textbox add:
;C:Program Files (x86)Javajre7 in;C:selenium11. restart Windows
12. create a file called hub.json in the C:selenium folder with the following contents:
{
"host": null,
"port": 4440,
"newSessionWaitTimeout": -1,
"servlets" : [],
"prioritizer": null,
"capabilityMatcher": "org.openqa.grid.internal.utils.DefaultCapabilityMatcher",
"throwOnCapabilityNotPresent": true,
"nodePolling": 5000,
"cleanUpCycle": 5000,
"timeout": 300000,
"browserTimeout": 0,
"maxSession": 5,
"jettyMaxThreads":-1
}
13. create a file called node.json in the C:selenium folder with the following contents:
{
"capabilities":[
{
"platform": "WINDOWS",
"browserName": "firefox",
"maxInstances": 1,
"seleniumProtocol": "WebDriver"
},{
"platform": "WINDOWS",
"browserName": "chrome",
"maxInstances": 1,
"seleniumProtocol": "WebDriver"
},{
"platform": "WINDOWS",
"browserName": "internet explorer",
"version": "11",
"maxInstances": 1,
"seleniumProtocol": "WebDriver"
},{
"platform": "WINDOWS",
"browserName": "internet explorer",
"version": "10",
"maxInstances": 1,
"seleniumProtocol": "WebDriver"
},{
"platform": "WINDOWS",
"browserName": "internet explorer",
"version": "9",
"maxInstances": 1,
"seleniumProtocol": "WebDriver"
},{
"platform": "WINDOWS",
"browserName": "internet explorer",
"version": "8",
"maxInstances": 1,
"seleniumProtocol": "WebDriver"
},{
"platform": "WINDOWS",
"browserName": "safari",
"maxInstances": 1,
"seleniumProtocol": "WebDriver"
}
],
"configuration":{
"maxSession":7,
"port":5550,
"host":"127.0.0.1",
"register":true,
"registerCycle": 5000,
"hubPort":4440,
"hubHost":"127.0.0.1",
"nodeTimeout":120,
"nodePolling":2000,
"registerCycle":10000,
"cleanUpCycle":2000,
"timeout":30000
}
}
14. test the Selenium server by:
i. opening a command prompt and typing:
java -jar C:seleniumselenium-server-standalone-2.41.0.jar -role hub -hubConfig C:seleniumhub.jsonii. opening another command prompt window and typing:
java -jar C:seleniumselenium-server-standalone-2.41.0.jar -role node -nodeConfig C:selenium ode.json -Dwebdriver.chrome.driver=chromedriver.exe -Dwebdriver.ie.driver=IEDriverServer.exeiii. open a browser and go to http://127.0.0.1:4440/grid/console and verify all browsers are displayed
15. stop the hub and node by closing each command prompt
16. download NSSM (used to start Selenium as a Windows service) and extract nssm-{version}win64 ssm.exe (assuming your OS is 64-bit, otherwise use the 32-bit NSSM executable) to C:selenium
17. open a command prompt and type:
nssm install seleniumhub java -jar C:seleniumselenium-server-standalone-2.41.0.jar -role hub -hubConfig C:seleniumhub.json18. then, type:
nssm install seleniumnode java -jar C:seleniumselenium-server-standalone-2.41.0.jar -role node -nodeConfig C:selenium ode.json -Dwebdriver.chrome.driver=chromedriver.exe -Dwebdriver.ie.driver=IEDriverServer.exe19. restart the computer
20. after it restarts, login, open a browser, and go to http://127.0.0.1:4440/grid/console to verify all browsers are displayed
21. add firewall exceptions by opening a command prompt and typing:
netsh advfirewall firewall add rule name="SeleniumIn" dir=in action=allow protocol=TCP localport=4440
netsh advfirewall firewall add rule name="SeleniumOut" dir=out action=allow protocol=TCP localport=4440
Congratulations! Your Selenium grid is now functional and you can use a Selenium WebDriver-compatible testing framework (such as Codeception, WebDriverJS, etc) to connect to it (using the servers actual IP address, not localhost or 127.0.0.1).
P.S. For security reasons, in my tutorial Ive used non-default ports 5550 and 4440 instead of the default 5555 and 4444. Feel free to use your own custom port numbers if you wish.
P.P.S. For ease and convenience, this tutorial installed the hub and node on the same server. In a more realistic scenario, there would be a central hub on one server and multiple worker nodes on separate servers. In that case, you would follow steps 1-4,8,10-12,14i,15-17,19,21 for the hub and all steps except 12,14i,14iii,17 for the node(s). You will also need to update the "host" and "hubHost" settings in step 13 to point to the nodes and hubs actual IP address, respectively.
_____________________________
Additional resources:
- DefaultHub.json
- DefaultNode.json
- grid2 configuration
- grid2/webdriver docs
Available link for download