Showing posts with label s3. Show all posts
Showing posts with label s3. Show all posts
Wednesday, October 26, 2016
Review Android 4 2 2 Jelly Bean XXUFME7 For Samsung Galaxy S3
Review Android 4 2 2 Jelly Bean XXUFME7 For Samsung Galaxy S3

You can download and flash this firmware like any firmware by Odin
Whats new in jelly bean 4.2.2 update :
1- New Lock screen and widgets (like the galaxy S4)
2- Notification drawer : New tab for all the quick settings icons


3- MyFiles : new icons for internal and external storage

4- New music player (like the galaxy S4)
You can control music player from lock screen


5- New S Voice (like the galaxy S4)

6- New settings UI (like the galaxy S4) with tabs


8- New unlock effect "Light effect" and sound

9- New tab in task manager "Clear defaults"
10- Total RAM available is 828 MB

11- New screen mode
12- Daydream
13- Driving mode under "My device" in settings
14- Voice control listed back settings
15- Keyboard : new option floating keyboard


16- Move Applications to SD card

17- New icon for calculator
YT Video link : http://www.youtube.com/watch?v=SK3V_pQDRpg
Notes :
~ This Firmware is just a pre-release of Android 4.2.2 jelly bean.
~ You can install it like any official FW it will NOT the increase binary counter nor changes the system status.
~ This leak firmware ONLY for the international galaxy S3 (GT-I9300)
~ WARNING : Backup your data before flashing this FW because it will wipe all your data
Links :
I9300XXUFME7 Firmware HERE
How to install this firmware by Odin HERE
Available link for download
Saturday, October 22, 2016
Galaxy S3 Neo GT I9300I Dd Boot Repair
Galaxy S3 Neo GT I9300I Dd Boot Repair
REQUIRMENTS
1) 16 GB SD card
2) Win32r
3) unbrick file
4) odin and stock firmware
Download Win32r
Download unbrick file
Download Odin
Download Stock Firmware
For 4 file repair firmware Srch tis file I9300IXXUAND1_I9300IOJVAND1 in z3x support or HWK support
Procedure
1) install the Win32r
2) download and extract the debrick.zip u will find a debrick.img
3) insert sd card (16 GB class 4 or 10) and format it
4) open Win32r
5) open img file and write to sd card
6) after complete remove sd card from pc and insert it into your neo
7) insert back the battery and press vol down + home + power button
8) u will get into download mode
9) now remove your sd card from mobile
10) open odin and add your firmware and flash
Note:Test nd post result
Available link for download
Wednesday, October 19, 2016
Samsung Galaxy S3 GT I9300 Simple Tutorial Root I9300UBUGML2 Android 4 3 Firmware
Samsung Galaxy S3 GT I9300 Simple Tutorial Root I9300UBUGML2 Android 4 3 Firmware
Samsung Galaxy S3 GT-I9300- Simple Tutorial Root I9300UBUGML2 Android 4.3 Firmware,A simple method to root I9300UBUGML2 Android 4.3 Jelly Bean Firmware is now available at NasirTech. Samsung Galaxy S3 GT-I9300 recently get updated to the I9300UBUGML2 4.3 Jelly Bean Firmware. If you yet to update the firmware, then update the same by following the above link. Hope you updated this latest firmware on your device and now you can root the UBUGML2 firmware using our simple tutorial below. The below guide will help you to root I9300UBUGML2 4.3 Jelly Bean Firmware running on Galaxy S3 GT-I9300. Continue reading the tutorial for complete guide.
After updating official firmware, your device no longer belongs to rooted device. So, after official firmware update, many of us prefer to root our device to enjoy some additional features that unrooted android device doesn’t offer. With a rooted android device, you can install apps that ask root permission, flash various custom ROMs, install MODs and tweak various features. Root removes default bloatware apps that free-up lots of memory space and extend the battery life. However, once rooted, manufacturer warranty will be void. But you can regain the warranty by following proper unroot process. To know more about benefits of rooting android device, read- Complete Note on What is Rooting and Benefits of Rooting Android Phone.
 So, want to root Galaxy S3 GT-I9300 Running I9300UBUGML2 4.3 Jelly Bean Firmware? Continue reading this page to get all the necessary steps to successfully root your device. The root file (CF-Auto-Root) we used in this tutorial is safe and have nearly 100% success rate. We’ll use Odin software to flash the root file.
The tutorial is made with simple step by step guide, so that even an android newbie user can follow and successfully root his/her device. However, in this process you may loss your personal data and settings. So, we recommend you to follow all the backup instructions before proceed to rooting guide.

After updating official firmware, your device no longer belongs to rooted device. So, after official firmware update, many of us prefer to root our device to enjoy some additional features that unrooted android device doesn’t offer. With a rooted android device, you can install apps that ask root permission, flash various custom ROMs, install MODs and tweak various features. Root removes default bloatware apps that free-up lots of memory space and extend the battery life. However, once rooted, manufacturer warranty will be void. But you can regain the warranty by following proper unroot process. To know more about benefits of rooting android device, read- Complete Note on What is Rooting and Benefits of Rooting Android Phone.
The tutorial is made with simple step by step guide, so that even an android newbie user can follow and successfully root his/her device. However, in this process you may loss your personal data and settings. So, we recommend you to follow all the backup instructions before proceed to rooting guide.
Warning!
- This rooting tutorial is only applicable for Samsung Galaxy S3 GT-I9300 model (m0). So, don’t try this in any other android device. Check your device model number from- Settings-About Phone.
- Rooting voids your phone’s manufacturer warranty. However, you can get back the warranty anytime by following proper unroot process or by flashing official firmware.
- This guide is for educational purpose and you should try this at your own risk. We are not responsible if your device experience a soft brick after following this tutorial.
Pre-Requisites:
- Check battery percentage, charge your device to a decent level of at least 60% battery power. Your device should not turn off during installation.
- Turn on USB Debugging mode, go to Settings-Developer Options-USB Debugging
- Backup important data and settings to external storage- follow this guide
- Install USB driver for your device on your computer- Download Samsung USB Driver
All the above pre-requisites are very important and must be followed before proceed to installation guide. Hope you get all the above points and done as mentioned. Now, you are ready to move to the final step of this tutorial where we have arranged a step by step details guide to root Galaxy S3 GT-I9300 running I9300UBUGML2 4.3 Jelly Bean firmware.
Steps to Root Galaxy S3 GT-I9300 Running I9300UBUGML2 4.3 Jelly Bean through Odin:
- Download CF-Auto-Root for Galaxy S3 I9300 and extract the Zip file: CF-Auto-Root-m0-m0xx-gti9300.zip
- Download Odin 3.09 and extract the Zip file: Odin3_V3.09.Zip
- Now, Switch off your phone and boot Galaxy S3 I9300 into Download Mode by pressing and holding the Volume Down+Home+Power buttons together (long press until the boot screen appear), now press Volume Up key to proceed to Download Mode.
- Run the Odin3 v3.09.exe file as an administrator (Right click on the .exe file and click on Run as administrator)
- Now connect your Galaxy S3 I9300 to your computer via USB cable
- In Odin3 screen, you should see a COM Port number like “0:[COM7]” at ID:COM section and “Added!” text at the message box. This means your device has been detected by Odin3.
- Make sure that, only the “Auto Reboot” and “F. Reset Time” options are checked.
- Now, click on the AP button and select the CF-Auto-Root-m0-m0xx-gti9300.tar.md5 file.
- Finally, click on the Start button to begin the rooting process, wait few moments.
- Once completed, you would see “PASS!” message in ID:COM port having green background
- Your phone should automatically reboot after completion
- You can now disconnect your phone from computer
- Finish
Congrats! You have completed the tutorial to root Galaxy S3 I9300 running I9300UBUGML2 4.3 Jelly Bean Firmware. Hope you successfully done the rooting process. If you followed everything as mentioned in the above tutorial, then your Galaxy S3 I9300 should now rooted and you have complete control over your device. Now, install apps that ask root permission or flash various custom ROMs. To verify your device is rooted or not, you can download and run the Root Checker App from Google Play Store. If you have any doubt or query about the tutorial, feel free to contact with us using the comment form below, and share your rooting experience with us.
Available link for download
No Warranty Void Root Android 4 3 for Samsung Galaxy S3 GT I9300
No Warranty Void Root Android 4 3 for Samsung Galaxy S3 GT I9300

Requirements :
- I9300_Root_Kernel file
- I9300_MK6_Kernel file
- Odin3
- Installed Samsung Kies or Samsung mobile USB driver
- Saferoot file
- All the process WONT wipe your data, but back it up just incase this process corrupt your data.
- Flash Root_Kernel.tar.md5 file by odin3 in PDA or AP section.
- Make sure Re-Partition is NOT selected.
- Root your device using SafeRoot method by following this guide : [No Warranty Void] Safe Root Android 4.3 for Galaxy S3/S4 Note 2
- Flash back the current kernel of your firmware MK6 until Samsung update it by Odin3

Congratulation, your galaxy S3 GT-I9300 is rooted on the latest version of Android 4.3 jelly bean without tripping flash (binary) counter.
YT video link : http://www.youtube.com/watch?v=3gYjoW22h7c
Notes:- Download and install manually busybox if the tool is failed to install it.
- Use this guide at your own risk
- This process and kernel files ONLY for the international version GT-I9300 and ONLY for Android 4.3 jelly bean.
- Normally this process will continue to work until Samsung starts to push Android 4.4 kitkat to the S3 (DONT use it on 4.4 kitkat, it will brick your device).
- You will not be able to receive OTA update, but you can update your device at any time by Kies or Odin3.
- This process is tested by me and worked on all the latest Android 4.3 jelly bean firmwares.
- To unroot your device --> Open SuperSU app / Settings / Full UnRoot.
- Odin3 v3.04 HERE, v3.07 HERE, v3.09 HERE
- Latest Samsung Mobile Driver HERE
- Latest Samsung Kies HERE
- Latest Samsung Kies 3 HERE
- I9300_Root_Kernel HERE
- I9300_MK6_Kernel HERE
- I9300_NB1_Kernel HERE thanks to "afham"
- SafeRoot files HERE
Available link for download
Sunday, October 16, 2016
How To Backup Restore EFS Partition IMEI For Samsung Galaxy S3
How To Backup Restore EFS Partition IMEI For Samsung Galaxy S3

Some users while installing a custom ROM, downgrade recovery or unlocking bootloader might lose the IMEI of there devices and this will lead to losing network
This Guide will help you to make a backup of the EFS partition for your galaxy S3
And if one day you lost/changed your devices IMEI or become NULL NULL, with this backup you will be able to restore it easily without any problem.
Requirements :
Rooted Samsung galaxy S3
Installed "KTool" app in your device (Link below)
Backing up instructions :
1- Open "KTool" app and accept the root permission


3- Open "My files" then sdcard (you will find the backed up files)

---------------------------------------------------
Restoring instructions : (ONLY IF YOU LOST THE IMEI)
1- Copy "efs.img" and "efs.tar.gz" files to the internal storage
2- Open "KTool" app and accept the root permission
3- Choose "Restore EFS from backup (DANGEROUS!)"
4- Tap on "Restore IMG"

YT Video link : http://www.youtube.com/watch?v=gf8JZSYbnkw
~ This process will not help if you didnt have a backup
~ The backup will be saved in the internal storage as "efs.img" and "efs.tar.gz"
~ KTool work only on Samsung galaxy S2/Note/Nexus/S3 (International I9300 - *NOT* US variants)
~ NEVER RESTORE IF YOU ALREADY DIDNT LOST THE IMEI
~ I am not responsible if something bad happened to your device (use this AT YOUR OWN RISK)
Downloads :
KTool app http://goo.gl/gcu66
Available link for download
Tuesday, October 11, 2016
How to Lock Unlock Bootloader for Samsung Galaxy S3 SCH I535
How to Lock Unlock Bootloader for Samsung Galaxy S3 SCH I535

Verizon model of the galaxy S3 is protected from flashing modified files so that flashing by Odin always fails, and if you want to flash modified files, you need to unlock bootloader first.
Unlocking bootloader instructions :
Backup your data first
1- Extract and Open "Odin3" as administrator (Link below)
2- Click on "PDA" button and browse to "VRALEC.bootchain.tar.md5" file (Link below)


4- Shut down your device then Put it into Download Mode (Volume Down + Home + Power)
5- Volume up to continue

7- Make sure re-partition is NOT SELECTED [important]
8- Click Start and wait a few seconds.
Done !
Locking bootloader instructions :
Its exactly the same of unlocking process but with different flashing file.
#2- Click on "PDA" button and browse to :
"VRBLK3_bootchain.tar.md5" file [if your device on jelly bean 4.1.1] or
"VRBMB1_bootchain.tar.md5" file [if your device on jelly bean 4.1.2] (Links below)
~ Its recommended to lock bootloader after you finish rooting or flashing custom recovery.
~ Download and Install Kies or Samsung mobile driver, if you didnt get a sign in ID:COM or "Added" in message box
~ I am not responsible if something bad happened to your device (use this AT YOUR OWN RISK)
~ This Tutorial for unlocking/locking bootloader NOT UNLOCKING NETWORK CARRIER
Downloads :
Odin3_v3.04 HERE, v3.07 HERE, v3.09 HERE
"VRALEC.bootchain.tar.md5" Unlock bootloader LINK
"VRBLK3_bootchain.tar.md5" Lock bootloader LINK (jelly bean 4.1.1)
"VRBMB1_bootchain.tar.md5" Lock bootloader LINK (jelly bean 4.1.2)
Latest Samsung Mobile Driver HERE
Latest Samsung Kies HERE
Available link for download
Sunday, October 9, 2016
Cherry Mobile Flare S3 Octa firmware stock rom to unbrick your phone
Cherry Mobile Flare S3 Octa firmware stock rom to unbrick your phone
Hi,
I havent posted firmware lately, been very busy. This is an old phone already and this firmware is for Cherry Mobile Flare S3 Octacore variant.
I have already tried and tested this firmware. And it is working flawlessly :)

Some pictures below are just an example of my previous post. Replace scatter file with the correct firmware that you downloaded.
1. Bootloop
2. Damaged System UI
3. TP Upgrade only
4. Dead phone but it is detected in computer
5. Remove Gmail Account / Password / Pattern Lock (Alternative Way)
6. Privacy Protection Password Lock up
7. Damage Apps (Force Closing)
8. Mount data error when hard resetting
9. Monkey Virus / Trojan Removal
"DOWNLOAD THESE FILES"
Firmware Here -->Cherry Mobile Flare S3 Octacore KK Part 1
Firmware Here -->Cherry Mobile Flare S3 Octacore KK Part 2
Firmware Here -->Cherry Mobile Flare S3 Octacore KK Part 3
VCOM Driver -->VCOM Manual
Alternative Driver --> AutoInstaller
SPFlashTool --> LatestVersion
"Use WinRar or 7zip to extract the firmware"
"Extract the files to your desired folder"
"If you encounter error in flashtool, use different version of it."
"Please report dead links"
"Extract the files to your desired folder"
"If you encounter error in flashtool, use different version of it."
"Please report dead links"
"I suggest to use 32bit Windows OS for compatibility of the driver"
"You can also use 64bit version, just disable driver signing or driver signature before installing the driver."
"This is also working in Windows 10, just use the AutoDriverInstaller for the driver"
Installing Driver with AutoInstaller
First try the Alternative Driver, which is the AutoInstaller. Just open the install.exe then it will automatically install the driver. To fully check if the driver is correctly installed in your computer.
Follow these steps:
- Turn off your phone (always powered off is a must)
- Press and hold volume up or down, or you can simple press the two button.
- Insert your USB cable without releasing the VOLUME button(s).
- In your computer, it must detect your phone and it will install the MTK Preloader or Mediatek USB VCOM driver.
- Repeat 1 to 4 if it does not detect your phone.
- If MTK Preloader/Mediatek USB VCOM Driver is installed you are good to go in flashing your phone ^_^
Reference Video using Driver Auto Installer (watch in HD)
Installing Manually using VCOM Driver
When installing it manually your phone must be turned off, then connect it to your computer/laptop while pressing VOLUME UP or VOLUME DOWN. This will detect and look for the driver.

1. This will be the first time that you will connect your phone and it will search for the correct driver.

2. Check include this location ... ... and click on browse. Look for USB VCOM Driver and Click on 2K_XP_COM folder if you are using Windows XP or Win7 for Windows 7 and then press OK when you are done picking the right folder for the driver.

3. If the driver is successfully installed MediaTek DA USB VCOM will appear in the New Hardware Wizard.
Video Installing VCOM Driver (please watch in HD)
"Your Phone must be turned off when you are ready to connect and flash your phone"
Flashing1. Launch FlashTool (flash_tool.exe)
2. In Flashtool, Click on Scatter-Loading, and load your scatter file. (see example below)
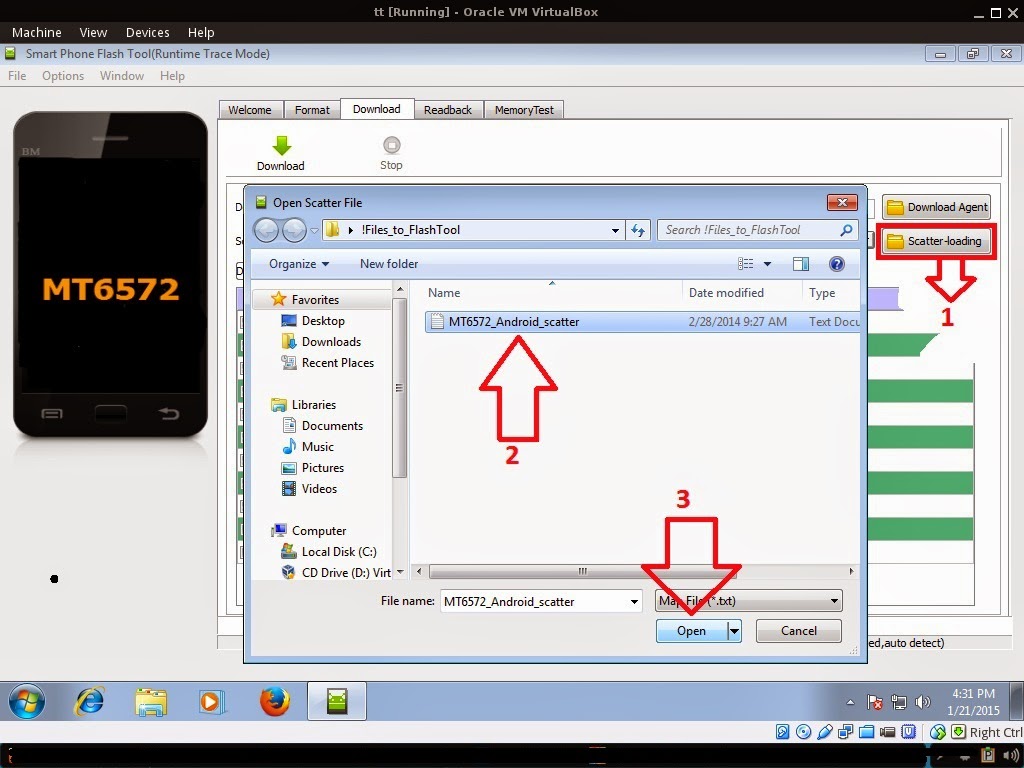 |
| Example only, May differ depending on phone. |
Reference Video Using FlashTool version 5.xxx (watch in HD)
3. After you load the file, UNCHECK PRELOADER and DSP only (Never flash preloader and DSP if available in firmware) If you cant proceed flashing without these two files then proceed at your own risk, press Press Download to Flash your Phone.
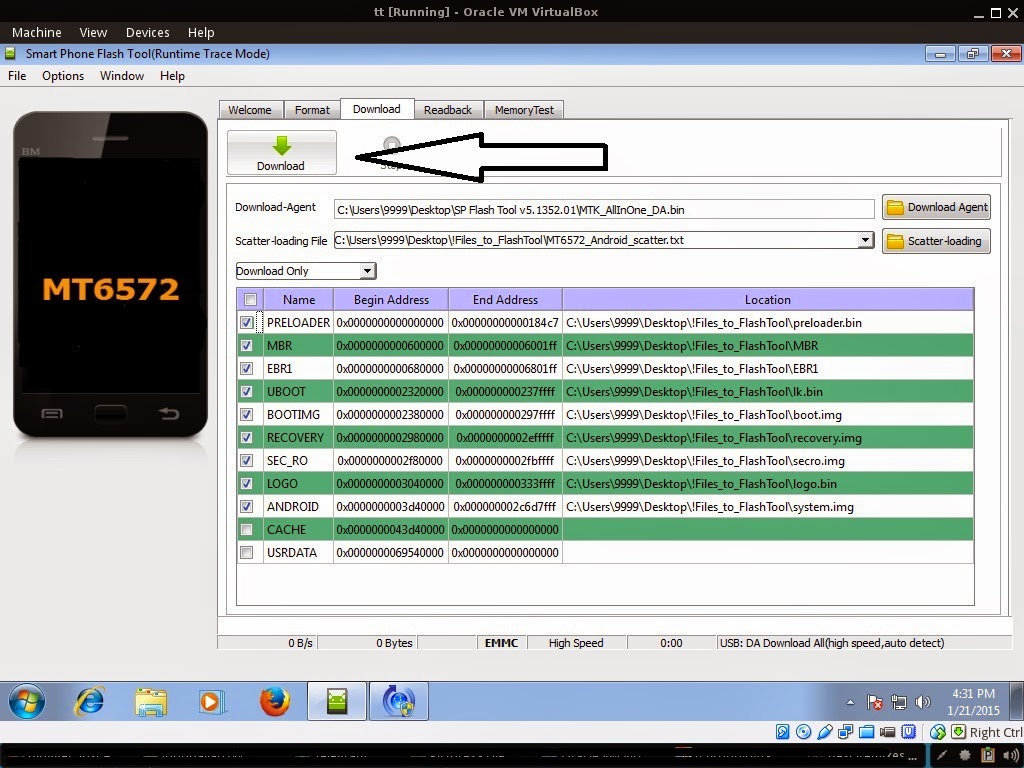
4. After you press Download Follow these steps
*** For non-removable battery just press the power button until the phone power up. Some phones have a reset button. You can press it to soft reset your phone.
Some workarounds:
- Turn off your phone or just remove the battery (always powered off is a must)
- Press and HOLD volume UP or Down or you can simply press it simultaneously
- Insert your USB cable without releasing the VOLUME button(s).
- Keep on repeating until Flashtool detected your phone.
*** For non-removable battery just press the power button until the phone power up. Some phones have a reset button. You can press it to soft reset your phone.
"Hard reset your phone after flashing"
Some workarounds:
If you encounter PMT_Changed error here is what you do:
In Latest version of Flashtool
- PMT_CHANGED error occur when firmware is not compatible with your phone. Sometimes your phone has a different board version. You should check it too, if your firmware is compatible with your phone.
- Try Firmware upgrade
- Try different version of flashtool
- Try to set Format All + Download
- Or try Manual Format first then Download. (Go to format tab and make sure to check format except bootloader then press the play icon/start)
If you encounter Privacy Protection Password:
- Open flash_tool.exe
- Load the scatter file
- Goto Format Tab
- Click on Format except bootloader
- Press Play/Start Icon
- Then remove battery
- Insert the battery again
- Insert the USB cable (you should hear a beep on your computer, and it should proceed in formatting.)
- After done formatting proceed in Flashing.
- Goto Download tab (I assume that you loaded the scatter file already)
- Uncheck PRELOADER (this is very important)
- Press Download
- Then remove battery
- Insert Battery again
- Insert the USB cable (you should hear a beep on your computer, and it should proceed in flashing or downloading the firmware in your phone.)
- Power ON the phone after flashing.
- Restore your IMEI.
For Invalid IMEI (Does not work in MT6571 SoC):
- Root your phone via vRoot/iRoot/Kingoroot or your preferred method in rooting you device. Your phone must be rooted first.
- Download MTKDroidsTool version 2.4.8 and version 2.5.3
- Enable your USB debugging in Developer Option (you also need this in rooting your phone via PC)
- Okay in your PC -- Open MTKDroidstool version 2.4.8 (Mtkdroidstool.exe) first. Make sure that you connected your phone already.
- Still in Mtkdroidstool -- Click ROOT
- In your phone -- A pop up dialogue will appear, just grant or allow it.
- In your PC -- If root shell is granted/allowed, Click in IMEI/NVRAM tab. If it is grayed out this is the time when you open the MTKDroidsTool version 2.5.3.
- Enter your original IMEI
- Click Replace
- Reboot your phone
1. Make sure you have MTKDROIDSTOOL version 2.4.8 or version 2.5.3 (you can search it in google)
I hope this tutorial help you. Please drop a comment if something is not clear to you.
Available link for download
Tuesday, October 4, 2016
Review Android 4 2 1 Jelly Bean XXUFMB3 FW For Samsung Galaxy S3
Review Android 4 2 1 Jelly Bean XXUFMB3 FW For Samsung Galaxy S3

You can download and flash this firmware like any firmware by Odin
Generally this update is a good step for the galaxy S3, i hope Samsung will improve the official update
Whats new in jelly bean 4.2.1 update :
1- New Lock screen and widgets
2- Notification drawer : New tab for all the quick settings icons
3- Apps : 3 new apps (Play Music,Snap n Go,OfficeSuite)

5- Gallery : The title bar when viewing pictures became transparent

- "My Sound" has been added to "Sounds" settings
- "Driving Mode" has been added to "Language and Input" settings
- (New) "Access to my location" and "My Places" have been added to "Location Services" settings
- "Cloud" has been returned to "Settings"
- "Voice Command" has been returned to "Settings"
- (New) "Daydream" has been added to "Display" settings
- (New) "Smart Pause" and "Smart Scroll" have been added to "Smart screen" settings (not working)
- Activating "Developer options" from "About device" by tapping 4 times on "Build number"
- (New) "Verify apps" has been added to "Security" settings (Appears when installing APK files)
- "Status" has been changed to "Custom" and "Official" instead of "Modified" and "Normal"
7- There is a dark shadow at the top of the home screens in TouchWiz
anything else still the same without changes
8- Total "RAM" has been reduced to 828MB instead of 832MB
9- "Notification panel" settings has been removed
10- Scrolling Notification settings icon has been disabled
11- "Contacts" and "Phone" app still lag
12- "Lock screen" has a little lag
13- "Swipe to capture" screen animation has been disabled


YT Video link : http://www.youtube.com/watch?v=syMQr8K7VE8
Notes : ~ This firmware isnt official mean if you flashed it , your device binary counter will be increased and status will be changed to "Modified"
Downloads :
i9300 - XXUFMB3 firmware http://goo.gl/3LB4K
Available link for download
Saturday, October 1, 2016
How to Install CM10 1 android 4 2 1 Jelly Bean ROM on Samsung Galaxy S3 I9300
How to Install CM10 1 android 4 2 1 Jelly Bean ROM on Samsung Galaxy S3 I9300
In this tutorial we will guide you step-by-step on how to install CM10.1 Android 4.2.1 Jelly Bean ROM on Samsung Galaxy S3 I9300.
CyanogenMod 10.1 Android v4.2.1 Jelly Bean provides an immense exhilaration to those by Samsung Galaxy S3 I9300 users desiring to enjoy the features of Jelly Bean 4.2.1 ROM. CyanogenMod, also known as simply CM, is undoubtedly the most greatly acknowledged unauthorized Android firmware, and day-by-day they are increasing their compatibility with numerous old and freshly arriving Android devices from different manufacturers., including our Samsung Galaxy S3 I9300. Many reviews show that CyanogenMod provides much more facilities than the official Android firmware. Installing CyanogenMod 10.1 Android 4.2.1 Jelly Bean on your Samsung Galaxy S3 I9300 will enable its user to sustain in the Jelly Bean environment.
So in this tutorial we will be showing you an installation guide regarding using CyanogenMod 10.1 Jelly Bean 4.2.1 ROM on Samsung Galaxy S3 I9300. Just follow the simple steps given below:
Disclaimer
This tutorial will definitely work when using Samsung Galaxy S3 I9300 only. While working of it on others is not yet confirmed. On applying this installation to another model or device may give an unwanted result. While applying this update we will not be responsible if anything occurs to your device, so continue at your own risk.
Pre-Requisite
- For successful completion of this rooting process charge your phone up to a minimum of 75% battery.
- You must take a back-up of all your personnel items and other impotent data, such as Call Logs, SMS, Contacts, Audios, Images, Videos, APN (Access Point Names) settings, Bookmarks, MMS settings, on your phone.
- One must install a custom recovery image particularly for his Android device. To do this, ClockworkMod Recovery should be downloaded using the Internet.
- If you have not, then you must unlock your Android device’s Bootloader. But due to unlocking of Bootloader, your Android device may lose its official Warranty. So to overcome this, download fastboot from Internet.
Steps for installing CM10.1 Android 4.2.1 Jelly Bean ROM on Samsung Galaxy S3 I9300
Step 1
From your Android device disconnect & remove the memory card and insert it in your Computer using a card reader. You must not use USB cable, since CyanogenMod do not work properly through USBs.
Step 2
Now do repartition of memory card, by just doing right click on the existing partition, choose Resize option, and then apply the sufficient amount of space towards your new partition. Make your new partition as your primary partition of Ext4 file system. Press the Apply option & remove your memory card now.
Step 3
Using the Internet, download: CM10.1 Android 4.2.1 Jelly Bean ROM for Samsung Galaxy S3 I9300.zip file and Google Apps in your Computer. Again reinsert it in the PC and then copy the above downloaded zip file in a folder named as “root” under your SD Card. Don’t run or try to open this file, just copy it in the folder.
Step 4
Now, remove your memory card from the Computer. Then shut-down your Android smartphone and then again insert back memory card in the phone.
Step 5
Now, enter into the Recovery Mode. For this just press the Down Volume & Home button simultaneously, and while pressing these buttons press down your Power button at the same time.
Step 6
Since you are now in the Recovery Mode, select the “install zip from SD card” option, and then select the “choose zip from SD card” option to browse into your SD Card. Now, navigate up to the downloaded “CM10.1 Android 4.2.1 Jelly Bean ROM for Samsung Galaxy S3 I9300.zip” file for flashing it on your phone.
Step 7
Now get yourself back to the main menu by pressing back button and then reboot your Android phone.
Step 8
After this, you’ll have CyanogenMod 10.1 ROM installed over your Samsung Galaxy S3 I9300.
Finished!
Available link for download
Friday, September 30, 2016
How To ROOT Any Ver of Samsung Galaxy S3 CF Auto Root
How To ROOT Any Ver of Samsung Galaxy S3 CF Auto Root

By this guide you can root the galaxy S3 which running on ice cream sandwich and jelly bean (4.0.4, 4.1.1, 4.1.2, 4.2.1, 4.2.2 and 4.3)
Rooting instructions :
Backup your data first
(For SCH-I535 Verizon galaxy S3 Android 4.1.1 and 4.1.2, you need to unlock bootloader first GO HERE)
1 - Download and install Kies or Samsung mobile USB driver.
2- Visit autoroot.chainfire and Download "CF-Auto-Root" file (Make sure that you have been chosen the correct file for your device model)

 3 - Unzip the downloaded file ONLY one time
4 - Run Odin as administrator
5 - Click on PDA button and browse to "CF-Auto-Root-....tar.md5" file that you extracted

 6 - Disconnect any device connected to USB ports on your computer and disable your antivirus software
7 - Shut down your device
8 - Put your device into Download Mode (Volume Down + Home + Power)
9 - Volume up to continue
10 - Connect the device to your computer by USB cable and wait until you get a sign in Odin (ID:COM section) and "Added" in message
 11 - Make sure re-partition is NOT TICKED [Very important]
12 - Click "Start" and wait a few seconds.

Rooting instructions :
Backup your data first
(For SCH-I535 Verizon galaxy S3 Android 4.1.1 and 4.1.2, you need to unlock bootloader first GO HERE)
1 - Download and install Kies or Samsung mobile USB driver.
2- Visit autoroot.chainfire and Download "CF-Auto-Root" file (Make sure that you have been chosen the correct file for your device model)
4 - Run Odin as administrator
5 - Click on PDA button and browse to "CF-Auto-Root-....tar.md5" file that you extracted
7 - Shut down your device
8 - Put your device into Download Mode (Volume Down + Home + Power)
9 - Volume up to continue
12 - Click "Start" and wait a few seconds.
YT Video link : http://www.youtube.com/watch?v=LwsvPO8jVGE
Notes :
~ Check this if you face problem after rooting How to Fix Android 4.3 Jelly Bean Rooting Problem for Galaxy S3/S4/Note 2/3
~ Do not disconnect the cable or turn off the device while rooting
~ I am not responsible if something bad happened to your device (USE AT YOUR OWN RISK)
~ This stuff is made for many version of Samsung galaxy devices
~ This process wont work for Verizon galaxy S3 Android 4.3
Visit this link http://autoroot.chainfire.eu/ for check if your device is listed or not .
~ The warranty of your device will be canceled because the flash counter will be increased
~ It will install SuperSU binary, APK and Stock recovery ONLY
~ CF-Auto-Root does not include CWM recovery
~ If SuperSU wasnt installed after rooting process, Install it from Google Play™
~ Difference between CF-Auto-Root and CF-Root :
CF-Root (non-Auto) is manually built rooted kernels and/or flashables that usually provide more than "just root".
CF-Auto-Root is built on an automated system which takes a stock recovery image and returns an automated rooting packages.
~ Credits goes to "Chainfire" (CF-Auto-Root developer)
~ XDA "CF-Auto-Root" thread http://goo.gl/6CrPu
Downloads :
- CF-Auto-Root website autoroot.chainfire
- Odin3 v3.04 HERE, v3.07 HERE, v3.09 HERE
- Latest Samsung Mobile Driver HERE
- Latest Samsung Kies HERE
- Latest Samsung Kies 3 HERE
Available link for download
Subscribe to:
Posts (Atom)