Tuesday, November 1, 2016
Winchester Europe 4 5 3 APK Download for Android
Winchester Europe 4 5 3 APK Download for Android

Direct Download Winchester Europe 4.5.3 APK Download for Android (com.omg.winchester) The newest and lastet version of this Apps is 4.5.3
You are about to download the Winchester Europe 4.5.3 apk file for Android 4.1 Winchester Europe is a free Sports Apps This apk does not include any cheat, crack, unlimited gold, ads….or any changes.
Choose one of the server location below to start to get the apk file for Winchester Europe, move the file to your Android phones SD card and then use one file manager you prefer to browse & install it. Enjoy.
Please be aware that ApkPlz only share the original and free apk installer for Winchester Europe 4.5.3 WITHOUT ANY cheat, crack, unlimited gold patch or any other modifications.
All the apps & games here are for home or personal use only. If any apk download infringes your copyright,
Click here to download Winchester Europe 4.5.3 apk for android
Available link for download
Samsung Galaxy S4 Zoom How to Install C101XWUANA1 Android 4 2 2 Jelly Bean Firmware How to Install
Samsung Galaxy S4 Zoom How to Install C101XWUANA1 Android 4 2 2 Jelly Bean Firmware How to Install
Important Note:
Android 4.2.2 Jelly Bean C101XWUANA1 Official Firmware Download List
Morocco (MWD): C101XWUANA1_C101OJVANA1_MWD.zip
Iraq: C101XWUANA1_C101OJVANA1_MID.zip
Saudi Arabia: C101XWUANA1_C101OJVANA1_WTL.zip
South Africa (Vodafone): C101XWUANA1_C101OJVANA1_XFV.zip[Firmware for rest of the countries and carrier will be update here when available]
Previous Firmware Build:
Samsung Galaxy Note 3 SM-N900- How to Install N900XXUDNA6 Android 4.4.2 KitKat Firmware.Samsung Galaxy S4 GT-I9500 How TO Root I9500XXUEMK8 Android 4.3 Jelly Bean Firmware
How To Root R950VXUBMK3 Android 4.3 Jelly Bean Firmware Running on US Cell Samsung Galaxy Note 2
How To Root L710VPUCMK3 Android 4.3 Jelly Bean Firmware Running on Samsung Galaxy S3
Samsung Galaxy I9205 Mega 6.3 JB Firmware How to Install I9205XXUCML8 4.2.2 Update Guide
Pre-Requisites:
- Check battery percentage, your device should have at least 60% battery power
- Turn on USB Debugging mode, go to Settings-Developer Options-USB Debugging
- Backup important data and settings to external storage- follow this guide
- Install USB driver for your device on your computer- Download Samsung USB Driver
Points to be noted:
- If you are using any Custom ROM such as- CyanogenMod, Paranoid Android, AOKP, SLIM ROMs etc, then it’ll replaced by this official Stock ROM
- Custom Recovery (CWM or TWRP Recovery) will be replaced by Stock Recovery
- After flashing official firmware, your device will no longer belongs to rooted device. However you can root your device any time after flashing the firmware.
How to Install Android 4.2.2 Jelly Bean Official Firmware on Galaxy S4 Zoom C101 through Odin:

- Download Android 4.2.2 XWUANA1 Firmware for Galaxy S4 Zoom C101 from the above list
- Download Odin 3.09
- Switch off your phone and boot Galaxy S4 Zoom C101 into Download Mode by pressing and holding the Volume Down+Home+Power buttons (long press until the boot screen appear), now press Volume Up key to proceed to Download Mode.
- Extract the downloaded Odin3.07 zip file and run the Odin3 v3.07.exe file as an administrator (Right click on the .exe file and click on Run as administrator)
- Now connect your Galaxy S4 Zoom C101 to your computer via USB cable
- In Odin3 screen, you should see a COM Port number like “0:[COM7]” at ID:COM section and “Added!” text at the message box. This means your device has been detected by Odin3.
- Make sure that, only the “Auto Reboot” and “F. Reset Time” options are checked.
- Now, extract the downloaded firmware zip file, you’ll find a firmware file with extension .tar.md5
- In Odin screen, click on PDA button and select the firmware file with .tar.md5 extension (The firmware file look something like: C101XXDLJ5_C101ODDDLI7_INU.tar.md5)
- Now, click on the Start button to begin the installation process, wait few moments.
- Once completed, you would see “PASS!” message in ID:COM port having green background
- Your phone should automatically reboot after completion
- You can now disconnect your phone from computer
- Finish
Available link for download
Monday, October 31, 2016
Android Studio 0 4 2 Portable
Android Studio 0 4 2 Portable
Android Studio is a new Android development environment based on liJ ID. Similar to Eclipse with the ADT Plugin, Android Studio provides integrated Android developer tools for development and debugging. On top of the capabilities you expect from liJ, Android Studio offers:Gradle-based build support.Android-specific refactoring and quick fixes.Lint tools to ch performance, usability, version compatibility and other problems.ProGuard and app-signing capabilities.Template-based wizards to crte common Android designs and components.A rich layout editor that allows you to drag-and-drop UI components, preview layouts on multiple screen configurations, and much more.Built-in support forGoogle Cloud Platform, making it sy to integrate Google Cloud Messaging and App Engine as server-side components.
Caution:Android Studio is currently available as anrly access preview. Several ftures are either incomplete or not yet implemented and you may encounter bugs. If you are not comfortable using an unfinished product, you may want to instd download (or continue to use) theADT Bundle(Eclipse with the ADT Plugin).
More info»
_______________________________________________
WARNINGnew version March 08! JDK issue resolved! Now its truly portable! Enjoy :)
_______________________________________________
DOWNLOAD
NEW VERSION MARCH 08
http://binbox.io/QJNiG#qrXic2HA orhttp://binbox.io/0Xmhx#g1dypoGA
_______________________________________________
Available link for download
Friday, October 28, 2016
Battle videobloggers 1 1 4 APK Download for Android
Battle videobloggers 1 1 4 APK Download for Android

Direct Download Battle videobloggers 1.1.4 APK Download for Android (air.bloggers) The newest and lastet version of this Apps is 1.1.4
You are about to download the Battle videobloggers 1.1.4 apk file for Android 2.3 Battle videobloggers is a free Sports Games This apk does not include any cheat, crack, unlimited gold, ads….or any changes.
Choose one of the server location below to start to get the apk file for Battle videobloggers, move the file to your Android phones SD card and then use one file manager you prefer to browse & install it. Enjoy.
Please be aware that ApkPlz only share the original and free apk installer for Battle videobloggers 1.1.4 WITHOUT ANY cheat, crack, unlimited gold patch or any other modifications.
All the apps & games here are for home or personal use only. If any apk download infringes your copyright,
Click here to download Battle videobloggers 1.1.4 apk for android
Available link for download
Thursday, October 27, 2016
Download EagleGet 2 0 4 8
Download EagleGet 2 0 4 8
| Eagleget Downloader |
Highlights
 EagleGet is a free all-in-one download manager; it can be integrated to Chrome, IE, Firefox, Opera, offering support for HTTP, HTTPS, FTP, MMS and RTSP protocol as well as popular online video websites. EagleGet uses advanced multi-threaded technology to speed up connections, along with automatic, manual and batch downloads. Downloading jobs can be dynamically adjust the priority, as well as sorted by various criteria. EagleGet supports multiple download queues with smart scheduler. It is possible to run different downloading jobs at corresponding fixed time or on any day(s) of the week. EagleGet automatically detects media contents on any website. The unique ad-free Media Grabber & Video Sniffer batch download HD videos with a single click. Media format conversion is also possible by installing proper component. EagleGet provides flexible notification configurations. The featured Silent Mode can temporarily turn off all notifications while a full-screen application or PC game is running. EagleGet contains automatic malware checker and file integrity verifier, the features that protecting users from virus attack as well as ensuring the downloaded file is genuine from the original. EagleGet is the first freeware download manager that supports the automatic refresh expired download links feature, which can auto update download URLs without re-starting from the beginning. EagleGet has visually appealing interface, and it’s completely free without any virus, malware or spyware.
All Features
* Download files in Chrome, IE, Firefox and Opera with one click.
* Support MMS, HTTP, HTTPS, FTP and RTSP protocols.
* Download online videos from popular sites.
* Built-in Media Grabber & Video Sniffer.
* Built-in download scheduler for multiple queues.
* Download different file types to separate folders.
* Batch downloads function with clipboard capture.
* Automatic refresh expired download address.
* Support HTTP and SOCKET proxy.
* Support fully customized User-Agent.
* Monitor running and completed tasks with TaskMonitor.
* Supports drag-and-drop to rearrange the priority of downloads.
* Automatic run virus scan after download.
* Automatic convert media format after download.
* Convenient task properties panel.
* Detailed connection log for each task.
* Verify integrity of downloaded files.
* Shutdown, hibernate or sleep computer after completing all transfers.
* Built-in speed limiter.
* Flexible notification configurations and Silent Mode (Game Mode) function.
* Import download lists from other download managers.
* Customizable user interface.
* Supports multi-language interface (more than 30 languages).
Download From Publisher Server : Download
Available link for download
Samsung Galaxy S4 Active Mini GT I8580 How to Install I8580XXUANB1 Android 4 2 2 Jelly Bean Firmware
Samsung Galaxy S4 Active Mini GT I8580 How to Install I8580XXUANB1 Android 4 2 2 Jelly Bean Firmware

Important Note:
Android 4.2.2 Jelly Bean I8580XXUANB1 Official Firmware Download List
Previous Firmware Build:
Samsung Galaxy Note 3 SM-N900- How to Install N900XXUDNA6 Android 4.4.2 KitKat Firmware.Samsung Galaxy S4 GT-I9500 How TO Root I9500XXUEMK8 Android 4.3 Jelly Bean Firmware
How To Root R950VXUBMK3 Android 4.3 Jelly Bean Firmware Running on US Cell Samsung Galaxy Note 2
How To Root L710VPUCMK3 Android 4.3 Jelly Bean Firmware Running on
Pre-Requisites:
- Check battery percentage, your device should have at least 60% battery power
- Turn on USB Debugging mode, go to Settings-Developer Options-USB Debugging
- Backup important data and settings to external storage- follow this guide
- Install USB driver for your device on your computer- Download Samsung USB Driver
Points to be noted:
- If you are using any Custom ROM such as- CyanogenMod, Paranoid Android, AOKP, SLIM ROMs etc, then it’ll replaced by this official Stock ROM
- Custom Recovery (CWM or TWRP Recovery) will be replaced by Stock Recovery
- After flashing official firmware, your device will no longer belongs to rooted device. However you can root your device any time after flashing the firmware.
How to Install Android 4.2.2 Jelly Bean Official Firmware on Galaxy S4 Active Mini I8580 through Odin:
- Download Android 4.2.2 XXUANB1 Firmware for Galaxy S4 Active Mini I8580 from the above list
- Download Odin 3.09
- Switch off your phone and boot Galaxy S4 Active Mini I8580 into Download Mode by pressing and holding the Volume Down+Home+Power buttons (long press until the boot screen appear), now press Volume Up key to proceed to Download Mode.
- Extract the downloaded Odin3.09 zip file and run the Odin3 v3.09.exe file as an administrator (Right click on the .exe file and click on Run as administrator)
- Now connect your Galaxy S4 Active Mini I8580 to your computer via USB cable
- In Odin3 screen, you should see a COM Port number like “0:[COM7]” at ID:COM section and “Added!” text at the message box. This means your device has been detected by Odin3.
- Make sure that, only the “Auto Reboot” and “F. Reset Time” options are checked.
- Now, extract the downloaded firmware zip file, you’ll find a firmware file with extension .tar.md5
- In Odin screen, click on AP button and select the firmware file with .tar.md5 extension (The firmware file look something like: I8580XXDLJ5_I8580ODDDLI7_INU.tar.md5)
- Now, click on the Start button to begin the installation process, wait few moments.
- Once completed, you would see “PASS!” message in ID:COM port having green background
- Your phone should automatically reboot after completion
- You can now disconnect your phone from computer
- Finish
Available link for download
Wednesday, October 26, 2016
Review Android 4 2 2 Jelly Bean XXUFME7 For Samsung Galaxy S3
Review Android 4 2 2 Jelly Bean XXUFME7 For Samsung Galaxy S3

You can download and flash this firmware like any firmware by Odin
Whats new in jelly bean 4.2.2 update :
1- New Lock screen and widgets (like the galaxy S4)
2- Notification drawer : New tab for all the quick settings icons


Available link for download
Monday, October 24, 2016
Betting Tips Predictions 4 0 APK Download for Android
Betting Tips Predictions 4 0 APK Download for Android

Direct Download Betting Tips: Predictions 4.0 APK Download for Android (com.mona.probettingtips) The newest and lastet version of this Apps is 4.0
You are about to download the Betting Tips: Predictions 4.0 apk file for Android 2.3 Betting Tips: Predictions is a free Sports Apps This apk does not include any cheat, crack, unlimited gold, ads….or any changes.
Choose one of the server location below to start to get the apk file for Betting Tips: Predictions, move the file to your Android phones SD card and then use one file manager you prefer to browse & install it. Enjoy.
Please be aware that ApkPlz only share the original and free apk installer for Betting Tips: Predictions 4.0 WITHOUT ANY cheat, crack, unlimited gold patch or any other modifications.
All the apps & games here are for home or personal use only. If any apk download infringes your copyright,
Click here to download Betting Tips: Predictions 4.0 apk for android
Available link for download
Nokia 111 Keypad 1 4 7 is not working solution
Nokia 111 Keypad 1 4 7 is not working solution

Keep in mind after dis assembly of Nokia 111 look at the whole mother board for carbon water damages and rust. Make it clean with electronics cleaner and apply heat so that it can be dry smoothly. Do not apply much heat because much heat can harm your skin and may can damage the mother board.
In above diagram you can see a resistance is identified. Remove it and it will solve keypad problem if keys are working duplicate. Nokia 111 keypad problem solution.
Available link for download
Microsoft Net Framework Latest 4 5 2 Full Offline Installer Free Download
Microsoft Net Framework Latest 4 5 2 Full Offline Installer Free Download

Available link for download
Sunday, October 23, 2016
Samsung Galaxy Note 3 Neo LTE SM N7505L How to Install N7505LUBUANB1 Android 4 3 Jelly Bean Firmware
Samsung Galaxy Note 3 Neo LTE SM N7505L How to Install N7505LUBUANB1 Android 4 3 Jelly Bean Firmware

So, want to update your Galaxy Note 3 Neo N7505L to the latest UBUANB1 Android 4.3 Jelly Bean firmware? For official way, either you can go for OTA (over the air) from Settings-About Phone-Software Update or download firmware through the Samsung Kies utility. However, most of us prefer manual way to update official firmware. So, in this article you’ll find step by step manual guide to update the latest Android 4.3 UBUANB1 firmware on your Galaxy Note 3 Neo N7505L through Odin.
Important Note:
“The firmware is released only for the Samsung Galaxy Note 3 Neo SM-N7505L model, so don’t try this in any other android device. Check your device model number from Settings-About Phone. Also the tutorial is based on Windows PC. Follow all the pre-requisites, procedures and steps carefully to avoid breaking your phone”.Android 4.3 Jelly Bean N7505LUBUANB1 Official Firmware Download List
Samsung rolled out the firmware for the following countries. The firmware which are unbranded or not locked to any carrier, no matter of which country or region, can be flashed on any Galaxy Note 3 Neo SM-N7505L model.Peru: PET-N7505LUBUANB1-20140225213115.zip
Dominican Republic (Claro): CDR-N7505LUBUANB1-20140225213023.zip
[Firmware for rest of the countries and carrier will be added here when available]
Pre-Requisites:
- Check battery percentage, your device should have at least 60% battery power
- Turn on USB Debugging mode, go to Settings-Developer Options-USB Debugging
- Backup important data and settings to external storage- follow this guide
- Install USB driver for your device on your computer- Download Samsung USB Driver
Points to be noted:
- If you are using any Custom ROM such as- CyanogenMod, Paranoid Android, AOKP, SLIM ROMs etc, then it’ll replaced by this official Stock ROM
- Custom Recovery (CWM or TWRP Recovery) will be replaced by Stock Recovery
- After flashing official firmware, your device will no longer belongs to rooted device. However you can root your device any time after flashing the firmware.
How to Install Android 4.3 Jelly Bean Official Firmware on Galaxy Note 3 Neo N7505L through Odin:
- Download Android 4.3 UBUANB1 Firmware for Galaxy Note 3 Neo N7505L from the above list
- Download Odin 3.09
- Switch off your phone and boot Galaxy Note 3 Neo N7505L into Download Mode by pressing and holding the Volume Down+Home+Power buttons (long press until the boot screen appear), now press Volume Up key to proceed to Download Mode.
- Extract the downloaded Odin3.09 zip file and run the Odin3 v3.09.exe file as an administrator (Right click on the .exe file and click on Run as administrator)
- Now connect your Galaxy Note 3 Neo N7505L to your computer via USB cable
- In Odin3 screen, you should see a COM Port number like “0:[COM7]” at ID:COM section and “Added!” text at the message box. This means your device has been detected by Odin3.
- Make sure that, only the “Auto Reboot” and “F. Reset Time” options are checked.
- Now, extract the downloaded firmware zip file, you’ll find a firmware file with extension .tar.md5
- In Odin screen, click on AP button and select the firmware file with .tar.md5 extension (The firmware file look something like: N7505LXXDLJ5_N7505LODDDLI7_INU.tar.md5)
- Now, click on the Start button to begin the installation process, wait few moments.
- Once completed, you would see “PASS!” message in ID:COM port having green background
- Your phone should automatically reboot after completion
- You can now disconnect your phone from computer
- Finish
Available link for download
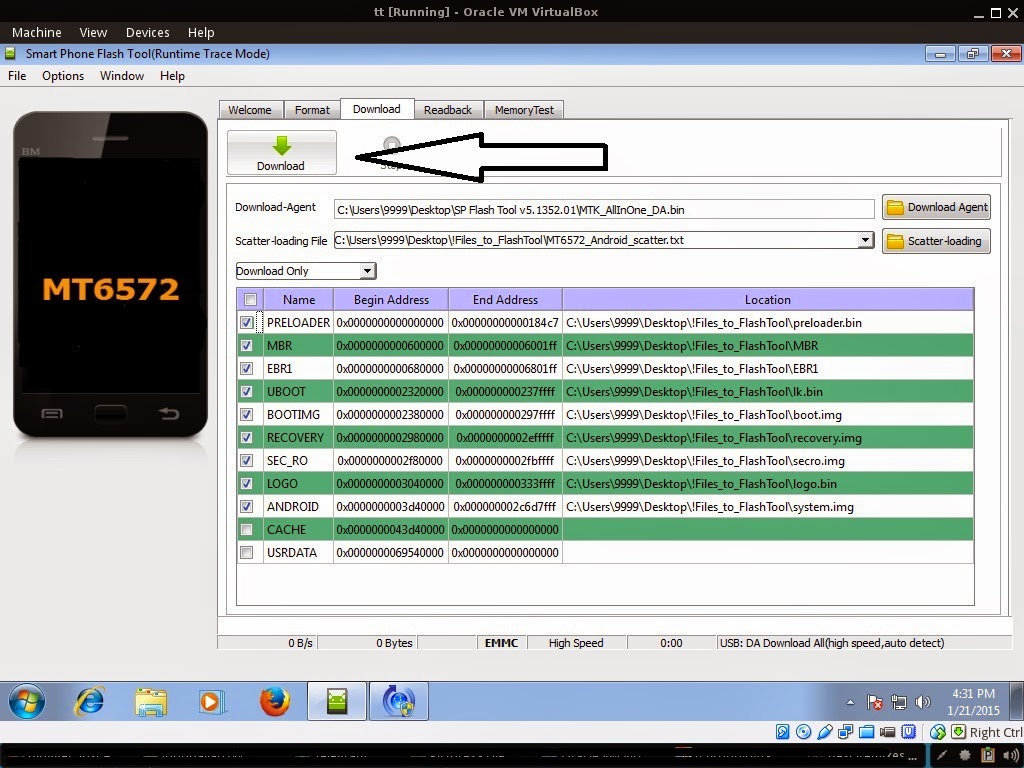
SKK Phoenix Tab 4 firmware stock rom to unbrick your phone
SKK Phoenix Tab 4 firmware stock rom to unbrick your phone
Hi,

This firmware is not yet rooted, you can use your favorite rooting application for PC such as vRoot/iRoot/Kingoroot or you can use an APK file which is Kingroot to root your device.
1. Bootloop
2. Damaged System UI
3. TP Upgrade only
4. Dead phone but it is detected in computer
5. Remove Gmail Account / Password / Pattern Lock (Alternative Way)
6. Privacy Protection Password Lock up
"DOWNLOAD THESE FILES"
Firmware Here -->SKK Phoenix Tab 4+
Alternative Driver --> AutoInstaller
"Extract the files to your desired folder"
"If you encounter error in flashtool, use different version of it."
"I suggest to use 32bit Windows OS for compatibility of the driver"
"You can also use 64bit version, just disable driver signing or driver signature before installing the driver."
Installing Driver with AutoInstaller
First try the Alternative Driver, which is the AutoInstaller. Just open the install.exe then it will automatically install the driver. To fully check if the driver is correctly installed in your computer.
Follow these steps:
- Turn off your phone (always powered off is a must)
- Press and hold volume up or down, or you can simple press the two button.
- Insert your USB cable without releasing the VOLUME button(s).
- In your computer, it must detect your phone and it will install the MTK Preloader or Mediatek USB VCOM driver.
- Repeat 1 to 4 if it does not detect your phone.
- If MTK Preloader/Mediatek USB VCOM Driver is installed you are good to go in flashing your phone ^_^
Reference Video using Driver Auto Installer (watch in HD)
Installing Manually using VCOM Driver

1. This is the first time that you will connect your phone and it will search for the correct driver.


3. If the driver is successfully installed MediaTek DA USB VCOM will appear in the New Hardware Wizard.
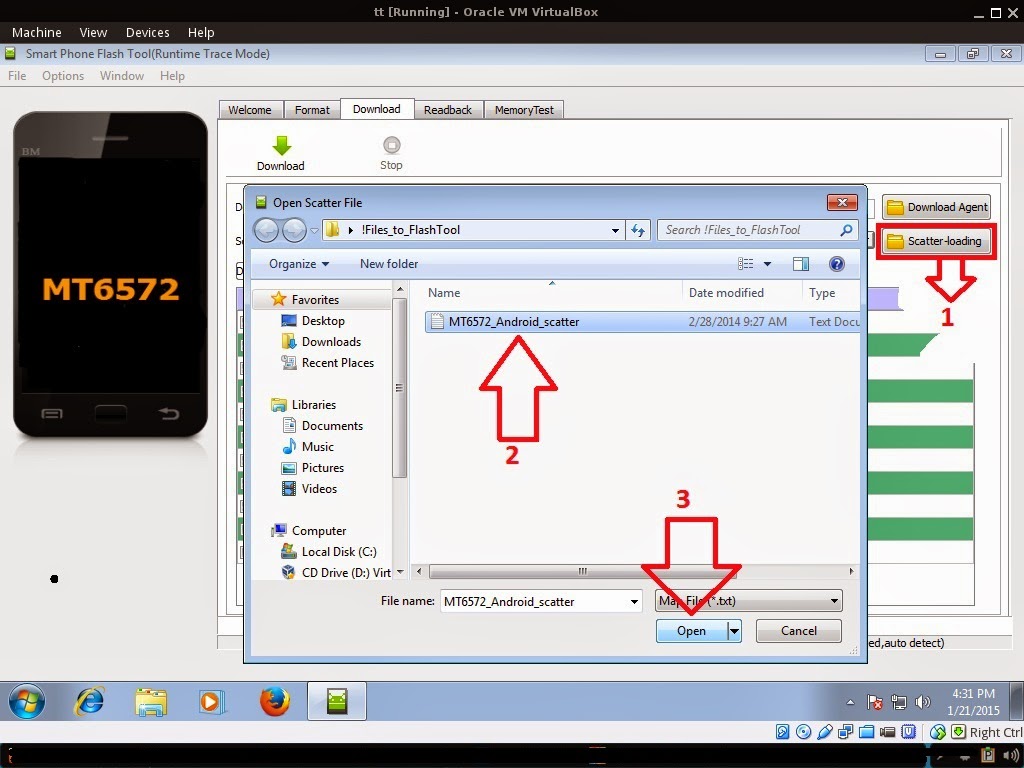
Reference Video Using FlashTool version 5.xxx (watch in HD)
3. After you load the file UNCHECK PRELOADER only (Never flash preloader and if available in firmware), If you cannot proceed in flashing without PRELOADER include PRELOADER. Proceed at your own risk, press Press Download to Flash your Phone.
- Turn off your phone (always powered off is a must)
- Press and HOLD volume UP or Down or you can simply press it simultaneously
- Insert your USB cable without releasing the VOLUME button(s).
- Keep on repeating until Flashtool detected your phone.
Some workarounds:
- PMT_CHANGED error occur when firmware is not compatible with your phone. Sometimes your phone has a different board version. You should check it too, if your firmware is compatible with your phone.
- Try Firmware upgrade
- Try different version of flashtool
- Try to set Format All + Download
- Or try Manual Format first then Download.
If you encounter Privacy Protection Password:
- Open flash_tool.exe
- Load the scatter file
- Goto Format Tab
- Click on Format except bootloader
- Press Play/Start Icon
- Then remove battery
- Insert the battery again
- Insert the USB cable (you should hear a beep on your computer, and it should proceed in formatting.)
- After done formatting proceed in Flashing.
- Goto Download tab (I assume that you loaded the scatter file already)
- Uncheck PRELOADER (this is very important)
- Press Download
- Then remove battery
- Insert Battery again
- Insert the USB cable (you should hear a beep on your computer, and it should proceed in flashing or downloading the firmware in your phone.)
- Power ON the phone after flashing.
- Restore your IMEI.
For Invalid IMEI (Does not work in MT6571 SoC):
- Root your phone via vRoot/iRoot/Kingoroot or your preferred method in rooting you device. Your phone must be rooted first.
- Download MTKDroidsTool version 2.4.8 and version 2.5.3
- Enable your USB debugging in Developer Option (you also need this in rooting your phone via PC)
- Okay in your PC -- Open MTKDroidstool version 2.4.8 (Mtkdroidstool.exe) first. Make sure that you connected your phone already.
- Still in Mtkdroidstool -- Click ROOT
- In your phone -- A pop up dialogue will appear, just grant or allow it.
- In your PC -- If root shell is granted/allowed, Click in IMEI/NVRAM tab. If it is grayed out this is the time when you open the MTKDroidsTool version 2.5.3.
- Enter your original IMEI
- Click Replace
- Reboot your phone
1. Make sure you have MTKDROIDSTOOL version 2.4.8 or version 2.5.3 (you can search it in google)
I hope this tutorial help you. Please drop a comment if something is not clear to you.
Available link for download
Saturday, October 22, 2016
Nexus Root Toolkit Latest Version V2 1 4 Free Download
Nexus Root Toolkit Latest Version V2 1 4 Free Download

- Choose Your Device Correctly And Build.
- Configure Your Drivers.
- Backup Your Important Data.
- Unlock Your Device.
- Root Your Device.
- · Galaxy Nexus: GSM Models (both yakju and non-yakju builds)
- · Galaxy Nexus: CDMA/LTE Verizon Models
- · Galaxy Nexus: CDMA/LTE Sprint Models
- · Nexus S: Worldwide, i9020t and i9023 Models
- · Nexus S: 850MHz, i9020a Models
- · Nexus S: Korea, m200 Models
- · Nexus S 4G: d720 Models
- · Nexus 7: Asus Tablet
- · Nexus 7 3G: Asus Tablet
- · Nexus 7 v2 (2013): Asus Tablet
- · Nexus 7 v2 (2013) LTE: Asus Tablet
- · Nexus 10: Samsung Tablet
- · Nexus 4: LG Phone
- · Nexus 5: LG Phone
- · Nexus 5X: LG Phone
- · Nexus 9: HTC Wifi Tablet
- · Nexus 9: HTC LTE Tablet
- · Nexus 6: Motorola Phone
- · Nexus 6P: Huawei Phone
- · Nexus Player: Google Device
Download Nexus Root Toolkit V2.0.5
Available link for download
LAS wx Las Vegas NV Weather v4 19 0 4 APK Download for Android
LAS wx Las Vegas NV Weather v4 19 0 4 APK Download for Android

Direct Download LAS wx: Las Vegas, NV Weather v4.19.0.4 APK Download for Android (com.doapps.id3187) The newest and lastet version of this Apps is v4.19.0.4
You are about to download the LAS wx: Las Vegas, NV Weather v4.19.0.4 apk file for Android 4.1 LAS wx: Las Vegas, NV Weather is a free Weather Apps This apk does not include any cheat, crack, unlimited gold, ads….or any changes.
Choose one of the server location below to start to get the apk file for LAS wx: Las Vegas, NV Weather, move the file to your Android phones SD card and then use one file manager you prefer to browse & install it. Enjoy.
Please be aware that ApkPlz only share the original and free apk installer for LAS wx: Las Vegas, NV Weather v4.19.0.4 WITHOUT ANY cheat, crack, unlimited gold patch or any other modifications.
All the apps & games here are for home or personal use only. If any apk download infringes your copyright,
Click here to download LAS wx: Las Vegas, NV Weather v4.19.0.4 apk for android
Available link for download
Thursday, October 20, 2016
How to Flash CyanogenMod 10 1 M2 on Samsung Google Nexus 10 P8110 with Android 4 2 2 Jelly Bean JDQ39
How to Flash CyanogenMod 10 1 M2 on Samsung Google Nexus 10 P8110 with Android 4 2 2 Jelly Bean JDQ39
Disclaimer
Pre-Requisite
- For successful completion of this rooting process charge your phone up to a minimum of 75% battery.
- You must take a back-up of all your personnel items and other impotent data, such as Call Logs, SMS, Contacts, Audios, Images, Videos, APN (Access Point Names) settings, Bookmarks, MMS settings, on your phone.
- One must install a custom recovery image particularly for his Android device. To do this, ClockworkMod Recovery should be downloaded using the Internet.
- If you have not, then you must unlock your Android device’s Bootloader.
Steps for Flashing/Installing CM10.1 M2 Android 4.2.2 Jelly Bean JDQ39 ROM on Samsung Google Nexus 10 P8110
Available link for download
Wednesday, October 19, 2016
Samsung Galaxy S3 GT I9300 Simple Tutorial Root I9300UBUGML2 Android 4 3 Firmware
Samsung Galaxy S3 GT I9300 Simple Tutorial Root I9300UBUGML2 Android 4 3 Firmware
After updating official firmware, your device no longer belongs to rooted device. So, after official firmware update, many of us prefer to root our device to enjoy some additional features that unrooted android device doesn’t offer. With a rooted android device, you can install apps that ask root permission, flash various custom ROMs, install MODs and tweak various features. Root removes default bloatware apps that free-up lots of memory space and extend the battery life. However, once rooted, manufacturer warranty will be void. But you can regain the warranty by following proper unroot process. To know more about benefits of rooting android device, read- Complete Note on What is Rooting and Benefits of Rooting Android Phone.

The tutorial is made with simple step by step guide, so that even an android newbie user can follow and successfully root his/her device. However, in this process you may loss your personal data and settings. So, we recommend you to follow all the backup instructions before proceed to rooting guide.
Warning!
- This rooting tutorial is only applicable for Samsung Galaxy S3 GT-I9300 model (m0). So, don’t try this in any other android device. Check your device model number from- Settings-About Phone.
- Rooting voids your phone’s manufacturer warranty. However, you can get back the warranty anytime by following proper unroot process or by flashing official firmware.
- This guide is for educational purpose and you should try this at your own risk. We are not responsible if your device experience a soft brick after following this tutorial.
Pre-Requisites:
- Check battery percentage, charge your device to a decent level of at least 60% battery power. Your device should not turn off during installation.
- Turn on USB Debugging mode, go to Settings-Developer Options-USB Debugging
- Backup important data and settings to external storage- follow this guide
- Install USB driver for your device on your computer- Download Samsung USB Driver
Steps to Root Galaxy S3 GT-I9300 Running I9300UBUGML2 4.3 Jelly Bean through Odin:

- Download CF-Auto-Root for Galaxy S3 I9300 and extract the Zip file: CF-Auto-Root-m0-m0xx-gti9300.zip
- Download Odin 3.09 and extract the Zip file: Odin3_V3.09.Zip
- Now, Switch off your phone and boot Galaxy S3 I9300 into Download Mode by pressing and holding the Volume Down+Home+Power buttons together (long press until the boot screen appear), now press Volume Up key to proceed to Download Mode.
- Run the Odin3 v3.09.exe file as an administrator (Right click on the .exe file and click on Run as administrator)
- Now connect your Galaxy S3 I9300 to your computer via USB cable
- In Odin3 screen, you should see a COM Port number like “0:[COM7]” at ID:COM section and “Added!” text at the message box. This means your device has been detected by Odin3.
- Make sure that, only the “Auto Reboot” and “F. Reset Time” options are checked.
- Now, click on the AP button and select the CF-Auto-Root-m0-m0xx-gti9300.tar.md5 file.
- Finally, click on the Start button to begin the rooting process, wait few moments.
- Once completed, you would see “PASS!” message in ID:COM port having green background
- Your phone should automatically reboot after completion
- You can now disconnect your phone from computer
- Finish
Available link for download
No Warranty Void Root Android 4 3 for Samsung Galaxy S3 GT I9300
No Warranty Void Root Android 4 3 for Samsung Galaxy S3 GT I9300

Requirements :
- I9300_Root_Kernel file
- I9300_MK6_Kernel file
- Odin3
- Installed Samsung Kies or Samsung mobile USB driver
- Saferoot file
- All the process WONT wipe your data, but back it up just incase this process corrupt your data.
- Flash Root_Kernel.tar.md5 file by odin3 in PDA or AP section.
- Make sure Re-Partition is NOT selected.
- Root your device using SafeRoot method by following this guide : [No Warranty Void] Safe Root Android 4.3 for Galaxy S3/S4 Note 2
- Flash back the current kernel of your firmware MK6 until Samsung update it by Odin3

- Download and install manually busybox if the tool is failed to install it.
- Use this guide at your own risk
- This process and kernel files ONLY for the international version GT-I9300 and ONLY for Android 4.3 jelly bean.
- Normally this process will continue to work until Samsung starts to push Android 4.4 kitkat to the S3 (DONT use it on 4.4 kitkat, it will brick your device).
- You will not be able to receive OTA update, but you can update your device at any time by Kies or Odin3.
- This process is tested by me and worked on all the latest Android 4.3 jelly bean firmwares.
- To unroot your device --> Open SuperSU app / Settings / Full UnRoot.
- Odin3 v3.04 HERE, v3.07 HERE, v3.09 HERE
- Latest Samsung Mobile Driver HERE
- Latest Samsung Kies HERE
- Latest Samsung Kies 3 HERE
- I9300_Root_Kernel HERE
- I9300_MK6_Kernel HERE
- I9300_NB1_Kernel HERE thanks to "afham"
- SafeRoot files HERE
Available link for download