Showing posts with label tab. Show all posts
Showing posts with label tab. Show all posts
Sunday, October 23, 2016
SKK Phoenix Tab 4 firmware stock rom to unbrick your phone
SKK Phoenix Tab 4 firmware stock rom to unbrick your phone
Hi,
This firmware is for SKK Phoenix Tab 4+. I havent tested it yet. It is a FULL ROM DUMP of the device.

This firmware is not yet rooted, you can use your favorite rooting application for PC such as vRoot/iRoot/Kingoroot or you can use an APK file which is Kingroot to root your device.
This firmware is not yet rooted, you can use your favorite rooting application for PC such as vRoot/iRoot/Kingoroot or you can use an APK file which is Kingroot to root your device.
1. Bootloop
2. Damaged System UI
3. TP Upgrade only
4. Dead phone but it is detected in computer
5. Remove Gmail Account / Password / Pattern Lock (Alternative Way)
6. Privacy Protection Password Lock up
"DOWNLOAD THESE FILES"
Firmware Here -->SKK Phoenix Tab 4+
VCOM Driver -->VCOM Manual
Alternative Driver --> AutoInstaller
Alternative Driver --> AutoInstaller
SPFlashTool --> LatestVersion
"Use WinRar or 7zip to extract the firmware"
"Extract the files to your desired folder"
"If you encounter error in flashtool, use different version of it."
"Extract the files to your desired folder"
"If you encounter error in flashtool, use different version of it."
"I suggest to use 32bit Windows OS for compatibility of the driver"
"You can also use 64bit version, just disable driver signing or driver signature before installing the driver."
Installing Driver with AutoInstaller
First try the Alternative Driver, which is the AutoInstaller. Just open the install.exe then it will automatically install the driver. To fully check if the driver is correctly installed in your computer.
Follow these steps:
- Turn off your phone (always powered off is a must)
- Press and hold volume up or down, or you can simple press the two button.
- Insert your USB cable without releasing the VOLUME button(s).
- In your computer, it must detect your phone and it will install the MTK Preloader or Mediatek USB VCOM driver.
- Repeat 1 to 4 if it does not detect your phone.
- If MTK Preloader/Mediatek USB VCOM Driver is installed you are good to go in flashing your phone ^_^
Reference Video using Driver Auto Installer (watch in HD)
Installing Manually using VCOM Driver
When installing it manually your phone must be turned off, then connect it to your computer/laptop while pressing VOLUME UP or VOLUME DOWN. This will detect and look for the driver.

1. This is the first time that you will connect your phone and it will search for the correct driver.

2. Check include this location ... ... and click on browse. Look for USB VCOM Driver and Click on 2K_XP_COM folder if you are using Windows XP or Win7 for Windows 7 and then press OK when you are done picking the right folder for the driver.

3. If the driver is successfully installed MediaTek DA USB VCOM will appear in the New Hardware Wizard.
Video Installing VCOM Driver (please watch in HD)
"Your Phone must be turned off when you are ready to connect and flash your phone"
Flashing1. Launch FlashTool (flash_tool.exe)
2. In Flashtool, Click on Scatter-Loading, and load your scatter file (located in firmware folder). (see example below)
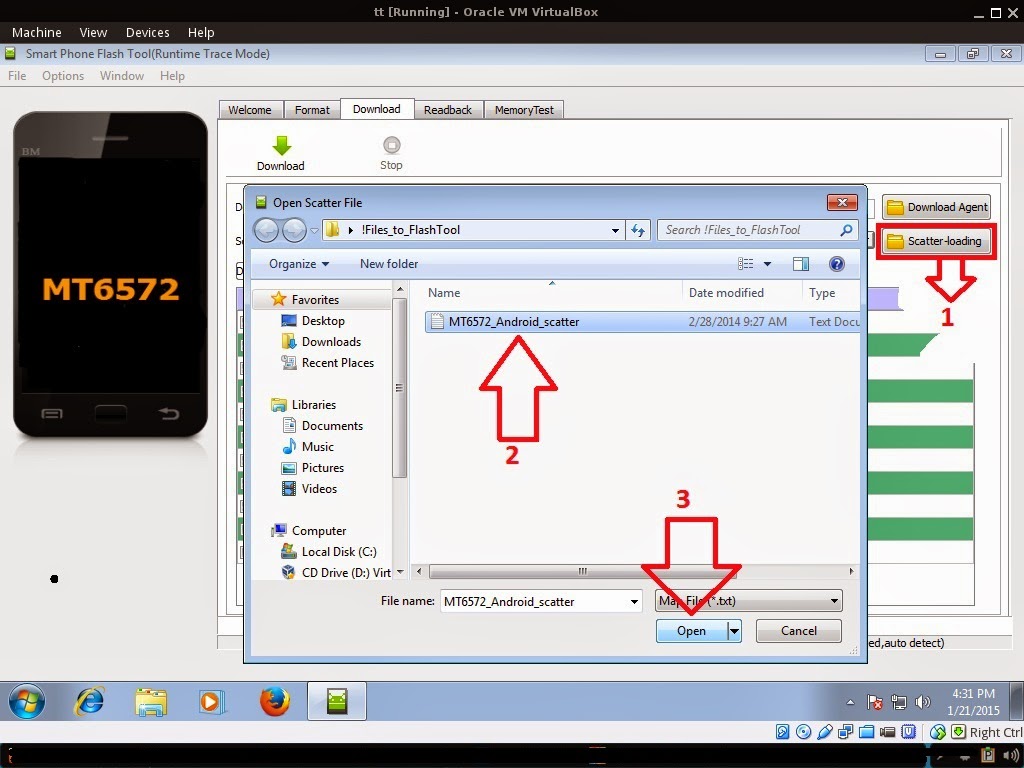
Reference Video Using FlashTool version 5.xxx (watch in HD)
3. After you load the file UNCHECK PRELOADER only (Never flash preloader and if available in firmware), If you cannot proceed in flashing without PRELOADER include PRELOADER. Proceed at your own risk, press Press Download to Flash your Phone.
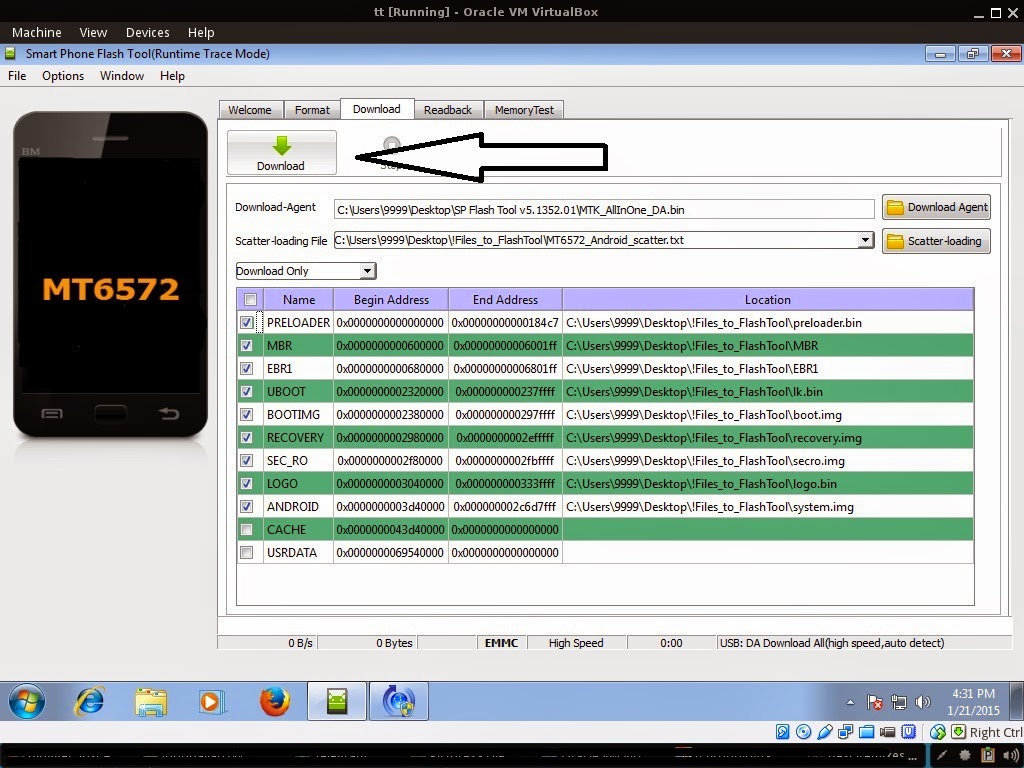
4. After you press Download Follow these steps
Some workarounds:
- Turn off your phone (always powered off is a must)
- Press and HOLD volume UP or Down or you can simply press it simultaneously
- Insert your USB cable without releasing the VOLUME button(s).
- Keep on repeating until Flashtool detected your phone.
"Hard reset your phone after flashing"
Some workarounds:
If you encounter PMT_Changed error here is what you do:
In Latest version of Flashtool
- PMT_CHANGED error occur when firmware is not compatible with your phone. Sometimes your phone has a different board version. You should check it too, if your firmware is compatible with your phone.
- Try Firmware upgrade
- Try different version of flashtool
- Try to set Format All + Download
- Or try Manual Format first then Download.
If you encounter Privacy Protection Password:
- Open flash_tool.exe
- Load the scatter file
- Goto Format Tab
- Click on Format except bootloader
- Press Play/Start Icon
- Then remove battery
- Insert the battery again
- Insert the USB cable (you should hear a beep on your computer, and it should proceed in formatting.)
- After done formatting proceed in Flashing.
- Goto Download tab (I assume that you loaded the scatter file already)
- Uncheck PRELOADER (this is very important)
- Press Download
- Then remove battery
- Insert Battery again
- Insert the USB cable (you should hear a beep on your computer, and it should proceed in flashing or downloading the firmware in your phone.)
- Power ON the phone after flashing.
- Restore your IMEI.
For Invalid IMEI (Does not work in MT6571 SoC):
- Root your phone via vRoot/iRoot/Kingoroot or your preferred method in rooting you device. Your phone must be rooted first.
- Download MTKDroidsTool version 2.4.8 and version 2.5.3
- Enable your USB debugging in Developer Option (you also need this in rooting your phone via PC)
- Okay in your PC -- Open MTKDroidstool version 2.4.8 (Mtkdroidstool.exe) first. Make sure that you connected your phone already.
- Still in Mtkdroidstool -- Click ROOT
- In your phone -- A pop up dialogue will appear, just grant or allow it.
- In your PC -- If root shell is granted/allowed, Click in IMEI/NVRAM tab. If it is grayed out this is the time when you open the MTKDroidsTool version 2.5.3.
- Enter your original IMEI
- Click Replace
- Reboot your phone
1. Make sure you have MTKDROIDSTOOL version 2.4.8 or version 2.5.3 (you can search it in google)
I hope this tutorial help you. Please drop a comment if something is not clear to you.
Available link for download
Monday, September 26, 2016
Samsung Galaxy Tab 3 Kids SM T2105 How to Install T2105UBANA1 Android 4 1 2 Jelly Bean Firmware
Samsung Galaxy Tab 3 Kids SM T2105 How to Install T2105UBANA1 Android 4 1 2 Jelly Bean Firmware
Samsung Galaxy Tab 3 Kids SM-T2105- How to Install T2105UBANA1 Android 4.1.2 Jelly Bean Firmware,T2105UBANA1 Android 4.1.2 Jelly Bean Firmware Last Updated on 26-Feb-2014. The Kids version of Samsung Galaxy Tab 3 Kids SM-T2105 recently received the UBANA1 4.1.2 Jelly Bean official firmware update. Samsung recently started rolled out an OTA update about the firmware. The latest firmware build version is T2105UBANA1. The device is running with Android 4.1.2 Jelly Bean from the release and not yet received any further android version. Samsung already released many regular firmware update for the device and here we have the latest available firmware for Galaxy Tab 3 Kids T2105. If you yet to update your device to this latest firmware then do it now by following the tutorial below. The below guide will help you to download and install the T2105UBANA1 Android 4.1.2 Jelly Bean Firmware manually through Odin. You can also check the latest available firmware for your device through OTA (over the air) from Settings-About Tablet-Software Update.
 The Galaxy Tab 3 Kids T2105 was released with Android 4.1.2 Jelly Bean and yet to receive Android 4.2.2 Jelly Bean or later android version. As the device already running on the Android 4.1.2 Jelly Bean, you can only expect few bug fixes and performance enhancement with this latest firmware update.All the above pre-requisites are very important and must follow before proceed to installation guide. Hope you get all the above points. Now, go through the below tutorial to install Android 4.1.2 T2105UBANA1 official firmware on Galaxy Tab 3 Kids T2105.

So, want to update your Galaxy Tab 3 Kids T2105 to the latest UBANA1 Android 4.1.2 Jelly Bean firmware? For official way, either you can go for OTA update or download firmware through the Samsung Kies utility. However, if you are looking for a manual way to update the latest Android 4.1.2 UBANA1 firmware on your Galaxy Tab 3 Kids T2105 through Odin then follow the step by step manual update guide below.
Important Note:
“The firmware is released only for the Samsung Galaxy Tab 3 Kids SM-T2105 model, so don’t try this in any other android device. Check your device model number from Settings-About Tablet. Also the tutorial is based on Windows PC. Follow all the pre-requisites, procedures and steps carefully to avoid breaking your Tablet”.
Android 4.1.2 Jelly Bean T2105UBANA1 Official Firmware Download List
Samsung rolled out the firmware for the following countries. The firmware which are unbranded or not locked to any carrier, no matter of which country or region, can be flashed on any Galaxy Tab 3 Kids SM-T2105 model.
Brazil: T2105UBANA1_T2105ZTOANA2_ZTO.zip | Link2
Trinidad and Tobago: TTT-T2105UBANA1-20140226134829.zip | Link2
Trinidad and Tobago: TTT-T2105UBANA1-20140226134829.zip | Link2
[Firmware for rest of the countries and carrier will be added here when available]
Pre-Requisites:
- Check battery percentage, your device should have at least 80% battery power
- Turn on USB Debugging mode,
- go to Settings-Developer Options-USB Debugging
- Backup important data and settings to external storage- follow this guide
- Install USB driver for your device on your computer- Download Samsung USB Driver
Points to be noted:
- If you are using any Custom ROM such as- CyanogenMod, Paranoid Android, AOKP, SLIM ROMs etc, then it’ll replaced by this official Stock ROM
- Custom Recovery (CWM or TWRP Recovery) will be replaced by Stock Recovery
- After flashing official firmware, your device will no longer belongs to rooted device. However you can root your device any time after flashing the firmware.
How to Install Android 4.1.2 Jelly Bean Official Firmware on Galaxy Tab 3 Kids T2105 through Odin:
- Download Android 4.1.2 UBANA1 Firmware for Galaxy Tab 3 Kids T2105 from the above list
- Download Odin 3.09
- Switch off your Tablet and boot Galaxy Tab 3 Kids T2105 into Download Mode by pressing and holding the Volume Down and Power keys together until you get the warning message, now press Volume Up key to proceed to Download Mode..
- Extract the downloaded Odin3.09 zip file and run the Odin3 v3.09.exe file as an administrator (Right click on the .exe file and click on Run as administrator)
- Now connect your Galaxy Tab 3 Kids T2105 to your computer via USB cable
- In Odin3 screen, you should see a COM Port number like “0:[COM7]” at ID:COM section and “Added!” text at the message box. This means your device has been detected by Odin3.
- Make sure that, only the “Auto Reboot” and “F. Reset Time” options are checked.
- Now, extract the downloaded firmware zip file, you’ll find a firmware file with extension .tar.md5
- In Odin screen, click on AP button and select the firmware file with .tar.md5 extension (The firmware file look something like: T2105XXDLJ5_T2105ODDDLI7_INU.tar.md5)
- Now, click on the Start button to begin the installation process, wait few moments.
- Once completed, you would see “PASS!” message in ID:COM port having green background
- Your Tablet should automatically reboot after completion
- You can now disconnect your Tablet from computer
- Finish
Congrats! you have completed the tutorial and your Galaxy Tab 3 Kids T2105 is now ready with the latest available firmware. Hope you successfully update UBANA1 Android 4.1.2 Jelly Bean official firmware on Galaxy Tab 3 Kids SM-T2105. If you followed everything as mentioned in the above tutorial, then your device should now running on the latest Android 4.1.2 Jelly Bean build version UBANA1. You can verify the firmware update details from Settings-About Tablet. For any queries feel free to contact with us any time and don’t forget to share your experience in the comment below.
Available link for download
Tuesday, September 13, 2016
Samsung Galaxy Tab 3 10 1 GT P5210 How to Install P5210ZCUANA1 Android 4 2 2 Jelly Bean Firmware
Samsung Galaxy Tab 3 10 1 GT P5210 How to Install P5210ZCUANA1 Android 4 2 2 Jelly Bean Firmware
Samsung Galaxy Tab 3 10.1 GT-P5210- How to Install P5210ZCUANA1 Android 4.2.2 Jelly Bean Firmware,P5210ZCUANA1 Android 4.2.2 Jelly Bean Firmware Last Updated on 24-Feb-2014. Samsung Galaxy Tab 3 10.1 GT-P5210 (WiFi) users can now update their device with the latest ZCUANA1 Android 4.2.2 Jelly Bean official firmware. Samsung recently rolled out an OTA update about the firmware. The latest firmware build version is P5210ZCUANA1. The device is running with Android 4.2.2 Jelly Bean from the release and there is no news about any further android version update for the Galaxy Tab 3 10.1 P5210. If you not yet updated your device with latest available firmware then do it now by following the tutorial below. The below guide will help you to download and install the P5210ZCUANA1 Android 4.2.2 Jelly Bean Firmware manually through Odin. You can also check the latest available firmware for your device through OTA (over the air) from Settings-About Tablet-Software Update.
 The Galaxy Tab 3 10.1 P5210 was released just few months back with Android 4.2.2 Jelly Bean and yet to receive Android 4.3 Jelly Bean or later android version. As the device already running on the Android 4.2.2 Jelly Bean, you can only expect few bug fixes and performance enhancement with this latest firmware update.
The Galaxy Tab 3 10.1 P5210 was released just few months back with Android 4.2.2 Jelly Bean and yet to receive Android 4.3 Jelly Bean or later android version. As the device already running on the Android 4.2.2 Jelly Bean, you can only expect few bug fixes and performance enhancement with this latest firmware update.So, want to update your Galaxy Tab 3 10.1 P5210 to the latest ZCUANA1 Android 4.2.2 Jelly Bean firmware? For official way, either you can go for OTA update or download firmware through the Samsung Kies utility. However, if you are looking for a manual way to update the latest Android 4.2.2 ZCUANA1 firmware on your Galaxy Tab 3 10.1 P5210 through Odin then follow the step by step manual update guide below.
Important Note:
“The firmware is released only for the Samsung Galaxy Tab 3 10.1 GT-P5210 model, so don’t try this in any other android device. Check your device model number from Settings-About Tablet. Also the tutorial is based on Windows PC. Follow all the pre-requisites, procedures and steps carefully to avoid breaking your Tablet”.
Android 4.2.2 Jelly Bean P5210ZCUANA1 Official Firmware Download List
Samsung rolled out the firmware for the following countries. The firmware which are unbranded or not locked to any carrier, no matter of which country or region, can be flashed on any Galaxy Tab 3 10.1 GT-P5210 model.
China: CHN-P5210ZCUANA1-20140224105916.zip
[Firmware for rest of the countries and carrier will be added here when available]
Samsung Galaxy S4 GT-I9500 How TO Root I9500XXUEMK8 Android 4.3 Jelly Bean Firmware
How To Root R950VXUBMK3 Android 4.3 Jelly Bean Firmware Running on US Cell Samsung Galaxy Note 2
How To Root L710VPUCMK3 Android 4.3 Jelly Bean Firmware Running on Samsung Galaxy S3
Samsung Galaxy I9205 Mega 6.3 JB Firmware How to Install I9205XXUCML8 4.2.2 Update Guide
Previous Firmware Build
Samsung Galaxy Note 3 SM-N900- How to Install N900XXUDNA6 Android 4.4.2 KitKat Firmware.Samsung Galaxy S4 GT-I9500 How TO Root I9500XXUEMK8 Android 4.3 Jelly Bean Firmware
How To Root R950VXUBMK3 Android 4.3 Jelly Bean Firmware Running on US Cell Samsung Galaxy Note 2
How To Root L710VPUCMK3 Android 4.3 Jelly Bean Firmware Running on Samsung Galaxy S3
Samsung Galaxy I9205 Mega 6.3 JB Firmware How to Install I9205XXUCML8 4.2.2 Update Guide
Pre-Requisites:
- Check battery percentage, your device should have at least 80% battery power
- Turn on USB Debugging mode, go to Settings-Developer Options-USB Debugging
- Backup important data and settings to external storage- follow this guide
- Install USB driver for your device on your computer- Download Samsung USB Driver
Points to be noted:
- If you are using any Custom ROM such as- CyanogenMod, Paranoid Android, AOKP, SLIM ROMs etc, then it’ll replaced by this official Stock ROM
- Custom Recovery (CWM or TWRP Recovery) will be replaced by Stock Recovery
- After flashing official firmware, your device will no longer belongs to rooted device. However you can root your device any time after flashing the firmware.
How to Install Android 4.2.2 Jelly Bean Official Firmware on Galaxy Tab 3 10.1 P5210 through Odin:
- Download Android 4.2.2 ZCUANA1 Firmware for Galaxy Tab 3 10.1 P5210 from the above list
- Download Odin 3.09
- Switch off your Tablet and boot Galaxy Tab 3 10.1 P5210 into Download Mode by pressing and holding the Volume Down and Power keys together until you get the warning message, now press Volume Up key to proceed to Download Mode..
- Extract the downloaded Odin3.09 zip file and run the Odin3 v3.09.exe file as an administrator (Right click on the .exe file and click on Run as administrator)
- Now connect your Galaxy Tab 3 10.1 P5210 to your computer via USB cable
- In Odin3 screen, you should see a COM Port number like “0:[COM7]” at ID:COM section and “Added!” text at the message box. This means your device has been detected by Odin3.
- Make sure that, only the “Auto Reboot” and “F. Reset Time” options are checked.
- Now, extract the downloaded firmware zip file, you’ll find a firmware file with extension .tar.md5
- In Odin screen, click on AP button and select the firmware file with .tar.md5 extension (The firmware file look something like: P5210XXDLJ5_P5210ODDDLI7_INU.tar.md5)
- Now, click on the Start button to begin the installation process, wait few moments.
- Once completed, you would see “PASS!” message in ID:COM port having green background
- Your Tablet should automatically reboot after completion
- You can now disconnect your Tablet from computer
- Finish
Available link for download
Friday, September 2, 2016
Samsung Galaxy Tab 2 7 0 GT P3100 How to Install P3100XWDNA1 Android 4 2 2 Jelly Bean Firmware
Samsung Galaxy Tab 2 7 0 GT P3100 How to Install P3100XWDNA1 Android 4 2 2 Jelly Bean Firmware
P3100XWDNA1 Android 4.2.2 Jelly Bean Firmware Last Updated on 26-Feb-2014. Samsung Galaxy Tab 2 7.0 GT-P3100 (3G+WiFi) recently received the latest XWDNA1 Android 4.2.2 Jelly Bean official firmware update. Samsung started rolling out an OTA update about the firmware. The latest firmware build version is P3100XWDNA1. The Galaxy Tab 2 7.0 was released in the beginning of the year 2012 with Android 2.3.6 Gingerbread Firmware and was schedule upgradable to Android 4.1 Jelly Bean. Samsung started pushing Android 4.2.2 Jelly Bean on Galaxy Tab 2 7.0 P3100 from the month of July 2013. Here we have the latest available firmware for the device. If you not yet updated your device to this latest available firmware, then do it now by following the tutorial below. The below guide will help you to download and install the P3100XWDNA1 Android 4.2.2 Jelly Bean Firmware manually through Odin. You can also check the latest available firmware for your device through OTA (over the air) from Settings-About Tablet-Software Update.  If your Galaxy Tab 2 7.0 P3100 already running on Android 4.2.2 Jelly Bean, then you can only expect few bug fixes and performance enhancement with this latest firmware update.
So, want to update your Galaxy Tab 2 7.0 P3100 to the latest XWDNA1 Android 4.2.2 Jelly Bean firmware? For official way, either you can go for OTA update or download firmware through the Samsung Kies utility. However, if you are looking for a manual way to update the latest Android 4.2.2 XWDNA1 firmware on your Galaxy Tab 2 7.0 P3100 through Odin then follow the step by step manual update guide below.
Important Note:
“The firmware is released only for the Samsung Galaxy Tab 2 7.0 GT-P3100 model, so don’t try this in any other android device. Check your device model number from Settings-About Tablet. Also the tutorial is based on Windows PC. Follow all the pre-requisites, procedures and steps carefully to avoid breaking your Tablet”.
Android 4.2.2 Jelly Bean P3100XWDNA1 Official Firmware Download List
Samsung rolled out the firmware for the following countries. The firmware which are unbranded or not locked to any carrier, no matter of which country or region, can be flashed on any Galaxy Tab 2 7.0 GT-P3100 model.
Switzerland: P3100XWDNA1_P3100AUTDNA1_AUT.zip
[Firmware for rest of the countries and carrier will be added here when available]
Samsung Galaxy Hennessy SCH-W789 Flip Phone- How to Insta W789KEUANA1 Android 4.1.2 Jelly Bean Firmware
Previous Firmware Build
Samsung Galaxy Pop E220S Android 4.1.2 Jelly Bean Firmware How to Install E220SKSANA2 Update GuideSamsung Galaxy Hennessy SCH-W789 Flip Phone- How to Insta W789KEUANA1 Android 4.1.2 Jelly Bean Firmware
Pre-Requisites:
- Check battery percentage, your device should have at least 80% battery power
- Turn on USB Debugging mode, go to Settings-Developer Options-USB Debugging
- Backup important data and settings to external storage- follow this guide
- Install USB driver for your device on your computer- Download Samsung USB Driver
Points to be noted:
- If you are using any Custom ROM such as- CyanogenMod, Paranoid Android, AOKP, SLIM ROMs etc, then it’ll replaced by this official Stock ROM
- Custom Recovery (CWM or TWRP Recovery) will be replaced by Stock Recovery
- After flashing official firmware, your device will no longer belongs to rooted device. However you can root your device any time after flashing the firmware.
How to Install Android 4.2.2 Jelly Bean Official Firmware on Galaxy Tab 2 7.0 P3100 through Odin:
- Download Android 4.2.2 XWDNA1 Firmware for Galaxy Tab 2 7.0 P3100 from the above list
- Download Odin 3.09
- Switch off your Tablet and boot Galaxy Tab 2 7.0 P3100 into Download Mode by pressing and holding the Volume Down and Power keys together until you get the warning message, now press Volume Up key to proceed to Download Mode..
- Extract the downloaded Odin3.07 zip file and run the Odin3 v3.07.exe file as an administrator (Right click on the .exe file and click on Run as administrator)
- Now connect your Galaxy Tab 2 7.0 P3100 to your computer via USB cable
- In Odin3 screen, you should see a COM Port number like “0:[COM7]” at ID:COM section and “Added!” text at the message box. This means your device has been detected by Odin3.
- Make sure that, only the “Auto Reboot” and “F. Reset Time” options are checked.
- Now, extract the downloaded firmware zip file, you’ll find a firmware file with extension .tar.md5
- In Odin screen, click on PDA button and select the firmware file with .tar.md5 extension (The firmware file look something like: P3100XXDLJ5_P3100ODDDLI7_INU.tar.md5)
- Now, click on the Start button to begin the installation process, wait few moments.
- Once completed, you would see “PASS!” message in ID:COM port having green background
- Your Tablet should automatically reboot after completion
- You can now disconnect your Tablet from computer
- Finish
So, you just completed the tutorial and your Galaxy Tab 2 7.0 P3100 is ready now with the latest available firmware. Hope you successfully Update XWDNA1 Android 4.2.2 Jelly Bean official firmware on Galaxy Tab 2 7.0 GT-P3100. If you followed everything as mentioned in the above tutorial, then your device should now running on the latest Android 4.2.2 Jelly Bean build version XWDNA1. You can verify the firmware update details from Settings-About Tablet. For any queries feel free to contact with us any time and don’t forget to share your experience in the comment below.
Available link for download
Tuesday, August 30, 2016
Samsung Galaxy Tab 3 10 1 GT P5200 How to Install P5200XXUANB2 Android 4 2 2 Jelly Bean Firmware
Samsung Galaxy Tab 3 10 1 GT P5200 How to Install P5200XXUANB2 Android 4 2 2 Jelly Bean Firmware
Samsung Galaxy Tab 3 10.1 GT-P5200- How to Install P5200XXUANB2 Android 4.2.2 Jelly Bean Firmware,P5200XXUANB2 Android 4.2.2 Jelly Bean Firmware Last Updated on 26-Feb-2014. Samsung Galaxy Tab 3 10.1 GT-P5200 (3G+WiFi) recently received the latest XXUANB2 Android 4.2.2 Jelly Bean official firmware. Samsung recently rolled out an OTA update about the firmware. However, the firmware is out for Italy. Hope the firmware will hit other part of the world soon. The Galaxy Tab 3 10.1 P5200 was released with Android 4.2.2 Jelly Bean out of the box and there is no news about any further android version update for the device. Here we have the latest available firmware for the tablet. If you own the device and not yet updated this latest available firmware then do it now by following the tutorial below. The below guide will help you to download and install the P5200XXUANB2 Android 4.2.2 Jelly Bean firmware manually through Odin.
 The Galaxy Tab 3 10.1 P5200 was released back in the year 2013 with Android 4.2.2 Jelly Bean and yet to receive Android 4.3 Jelly Bean or later android version. As the device already running on the Android 4.2.2 Jelly Bean, you can only expect few bug fixes and performance enhancement with this latest firmware update.
All the above pre-requisites are very important and must follow before proceed to installation guide. Hope you get all the above points. Now, go through the below tutorial to install Android 4.2.2 P5200XXUANB2 official firmware on Galaxy Tab 3 10.1 P5200.
So, want to update your Galaxy Tab 3 10.1 P5200 to the latest XXUANB2 Android 4.2.2 Jelly Bean firmware? For official way, either you can go for OTA (over the air) from Settings-About Tablet-Software Update or download firmware through the Samsung Kies utility. However, if you are looking for a manual way to update the latest Android 4.2.2 XXUANB2 firmware on your Galaxy Tab 3 10.1 P5200 through Odin then follow the step by step manual update guide below.
Important Note:
“The firmware is released only for the Samsung Galaxy Tab 3 10.1 GT-P5200 model, so don’t try this in any other android device. Check your device model number from Settings-About Tablet. Also the tutorial is based on Windows PC. Follow all the pre-requisites, procedures and steps carefully to avoid breaking your Tablet”.
Android 4.2.2 Jelly Bean P5200XXUANB2 Official Firmware Download List
Samsung rolled out the firmware for the following countries. The firmware which are unbranded or not locked to any carrier, no matter of which country or region, can be flashed on any Galaxy Tab 3 10.1 GT-P5200 model.
Italy:
P5200XXUANB2_P5200ITVANB2_ITV.zip | ITV-P5200XXUANB2-20140225154932.zip
P5200XXUANB2_P5200ITVANB2_ITV.zip | ITV-P5200XXUANB2-20140225154932.zip
[Firmware for rest of the countries and carrier will be added here when available]
Previous Firmware Build:
Samsung Galaxy S4 GT-I9500- Simple Tutorial How to Root I9500XXUFNB3 Android 4.4.2 KitKat FirmwareSamsung GT-I9500 Android 4.4.2 KitKat Firmware Download I9500XXUFNB3 for Russia SER working firmware download now.
Samsung Galaxy Note 3 SM-N900- How to Install N900XXUDNA6 Android 4.4.2 KitKat Firmware.
Samsung GT-I9500 India INU- Android 4.4.2 Official Firmware Update guide
Pre-Requisites:
- Check battery percentage, your device should have at least 80% battery power
- Turn on USB Debugging mode, go to Settings-Developer Options-USB Debugging
- Backup important data and settings to external storage- follow this guide
- Install USB driver for your device on your computer- Download Samsung USB Driver
Points to be noted:
- If you are using any Custom ROM such as- CyanogenMod, Paranoid Android, AOKP, SLIM ROMs etc, then it’ll replaced by this official Stock ROM
- Custom Recovery (CWM or TWRP Recovery) will be replaced by Stock Recovery
- After flashing official firmware, your device will no longer belongs to rooted device. However you can root your device any time after flashing the firmware.
How to Install Android 4.2.2 Jelly Bean Official Firmware on Galaxy Tab 3 10.1 P5200 through Odin:
- Download Android 4.2.2 XXUANB2 Firmware for Galaxy Tab 3 10.1 P5200 from the above list
- Download Odin 3.09
- Switch off your Tablet and boot Galaxy Tab 3 10.1 P5200 into Download Mode by pressing and holding the Volume Down and Power keys together until you get the warning message, now press Volume Up key to proceed to Download Mode..
- Extract the downloaded Odin3.09 zip file and run the Odin3 v3.09.exe file as an administrator (Right click on the .exe file and click on Run as administrator)
- Now connect your Galaxy Tab 3 10.1 P5200 to your computer via USB cable
- In Odin3 screen, you should see a COM Port number like “0:[COM7]” at ID:COM section and “Added!” text at the message box. This means your device has been detected by Odin3.
- Make sure that, only the “Auto Reboot” and “F. Reset Time” options are checked.
- Now, extract the downloaded firmware zip file, you’ll find a firmware file with extension .tar.md5
- In Odin screen, click on AP button and select the firmware file with .tar.md5 extension (The firmware file look something like: P5200XXDLJ5_P5200ODDDLI7_INU.tar.md5)
- Now, click on the Start button to begin the installation process, wait few moments.
- Once completed, you would see “PASS!” message in ID:COM port having green background
- Your Tablet should automatically reboot after completion
- You can now disconnect your Tablet from computer
- Finish
Congrats! Your Galaxy Tab 3 10.1 P5200 is ready now with the latest available firmware. Hope you successfully update XXUANB2 Android 4.2.2 Jelly Bean official firmware on Galaxy Tab 3 10.1 GT-P5200. If you followed everything as mentioned in the above tutorial, then your device should now running on the latest Android 4.2.2 Jelly Bean build version XXUANB2. You can verify the firmware update details from Settings-About Tablet. For any queries feel free to contact with us any time and don’t forget to share your experience in the comment below.
Available link for download
Friday, August 19, 2016
Samsung Galaxy Tab 2 10 1 Wi Fi GT P5110 receiving Android 4 2 2 update in Germany
Samsung Galaxy Tab 2 10 1 Wi Fi GT P5110 receiving Android 4 2 2 update in Germany
Samsung
Galaxy Tab 2 10.1 Wi-Fi (GT-P5110) receiving Android 4.2.2 update in Germany
100% tested firmware here download now
Download From here
Download From here
Available link for download
Subscribe to:
Posts (Atom)